While in a virtual visit with your patient, or your patient and their guests, you can mute and turn off participants' audio and video, send group and private messages, return participants to the virtual waiting room, and select how you want to view and interact with participants.
Starting a Visit
To start a visit with a patient in your waiting room queue who does not have any guests, select the Start Visit button.
To start a call with a patient and guests, select the Start Group Visit button or select the drop down and then select Start Group Visit.
To start a call with the patient only, select the drop down and then select Start Patient Call.
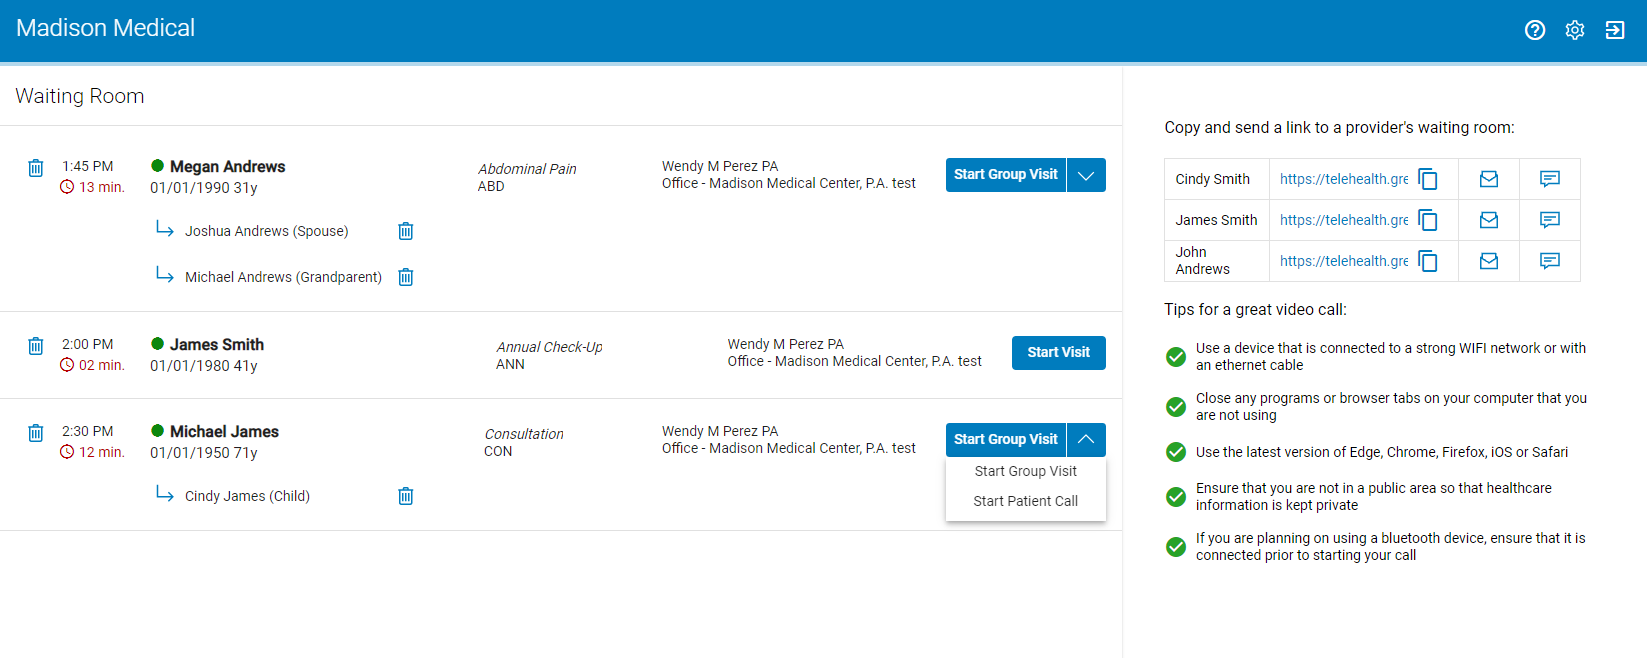
While in a virtual visit with your patient, the Start Visit or Start Group Visit buttons are disabled and will show In Call instead of Start Visit or Start Group Visit. This prevents other authorized users from starting a call while it is in session. If a patient is returned to the waiting room queue, the Start Visit and Start Group Visit buttons are re-enabled.
Only Intergy clients on v12.15 or later, and Prime Suite clients on v18.00.04.00 or later will see patient appointment information in the waiting room queue.
Do not access your virtual waiting room or conduct a virtual visit with your patients while operating a motor vehicle.
If you plan on using a Bluetooth device (for example, Bluetooth headphones), you must connect your Bluetooth device to your phone, laptop, etc. prior to starting your call.
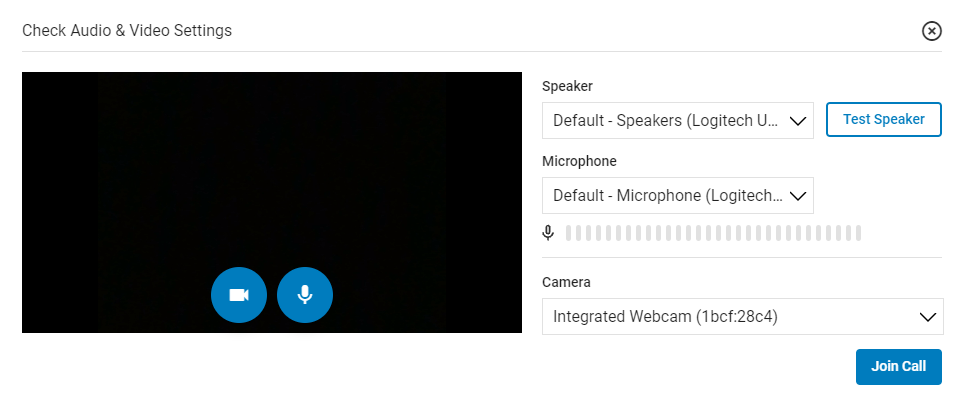
Check Audio & Video Settings Prior to Call
After selecting the Start Visit or Start Group Visit buttons in your waiting room, you will see the Check Audio & Video Settings window. In this window, you can test your speaker, microphone, and camera, and change each of these to a different device if necessary.
To test your speaker, select the Test Speaker button. If your speakers are working properly, you will hear a ringing sound.
To test your microphone (make sure you unmute your microphone by selecting the microphone icon), speak into your microphone. The microphone meter registers any input from the currently selected microphone.
To test your camera, toggle the camera on and off by selecting the camera icon.
To modify the devices for your speaker, microphone, or camera, select an alternative device from the dropdowns for each.
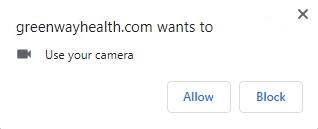
Additionally, after selecting the Start Visit or Start Group Visit buttons in your waiting room, you may also be asked to allow the site to access your microphone and camera. Select Allow for both prompts.
If you are having difficulty seeing or hearing yourself or your patient after joining a call, see the Camera Issues or Microphone Issues help topics for possible solutions.
When you are done testing or modifying your audio and video settings, select the Join Call button to join the call, or select the X to exit the window and return to the virtual waiting room.
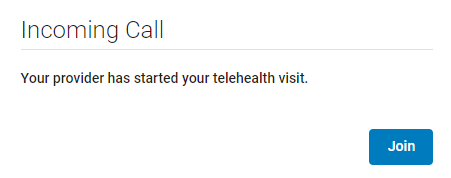
Your Telehealth call will begin after your patient selects Join Call. For more information on how patients join a virtual visit, see the help topic here.
Notes
-
If you mute (or unmute) either your camera or microphone in the Check Audio & Video Settings window, your camera or microphone will be muted (or unmuted) when you join the call.
-
The Check Audio & Video Settings window remembers your previous selections the next time you start a call. For example, if you previously muted your camera and microphone in the Check Audio & Video Settings window, your camera and microphone will be muted the next time you see the window.
-
The Check Audio & Video Settings window appears for every call you initiate from the virtual waiting room.
-
If can modify your audio and video device settings while in a call by selecting the
 icon and modifying them in the Device Settings window.
Participant's Audio and Video Messages
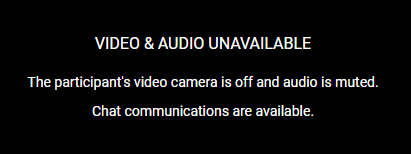
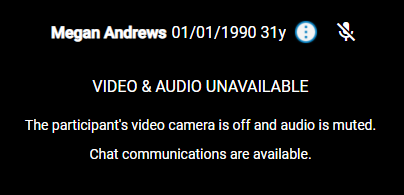
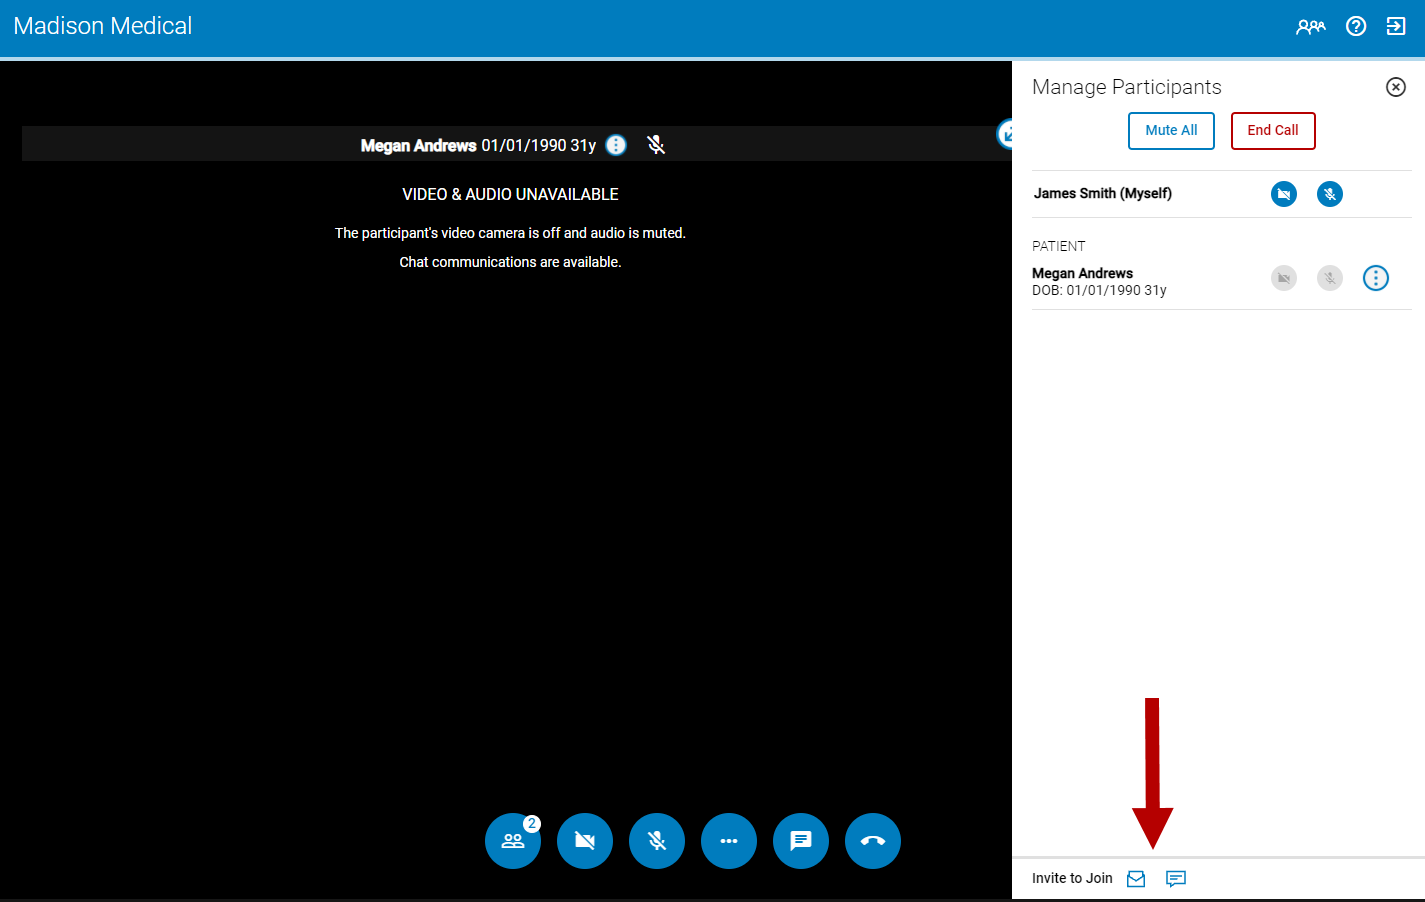
If a call participant's audio and video are unavailable during your virtual visit (either because the patient turned off the microphone and the camera, because of microphone and camera issues, or because you have muted a participant's audio and turned off their video), you will see the following message:
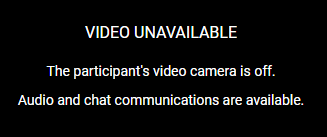
If only the participant's video camera is turned off, you will see the following message:
If a participant's audio is muted while in a call, you will see the muted microphone icon next to the participant's name.
If a participant is experiencing audio difficulties, you can use the Chat feature to directly communicate with the call participant.
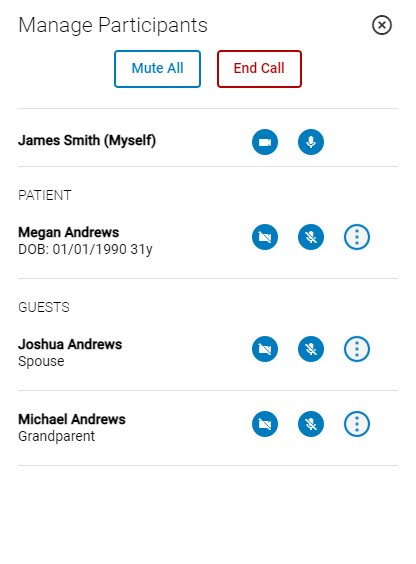
Managing Participants
In the Manage Participants panel, users are able to mute participants audio and turn off their video, send private messages, place participants in the waiting room, or remove them from the call.
To access the Manage Participants panel select the ![]() icon.
icon.
The number on the icon indicates the number of participants in the call including the practice user.
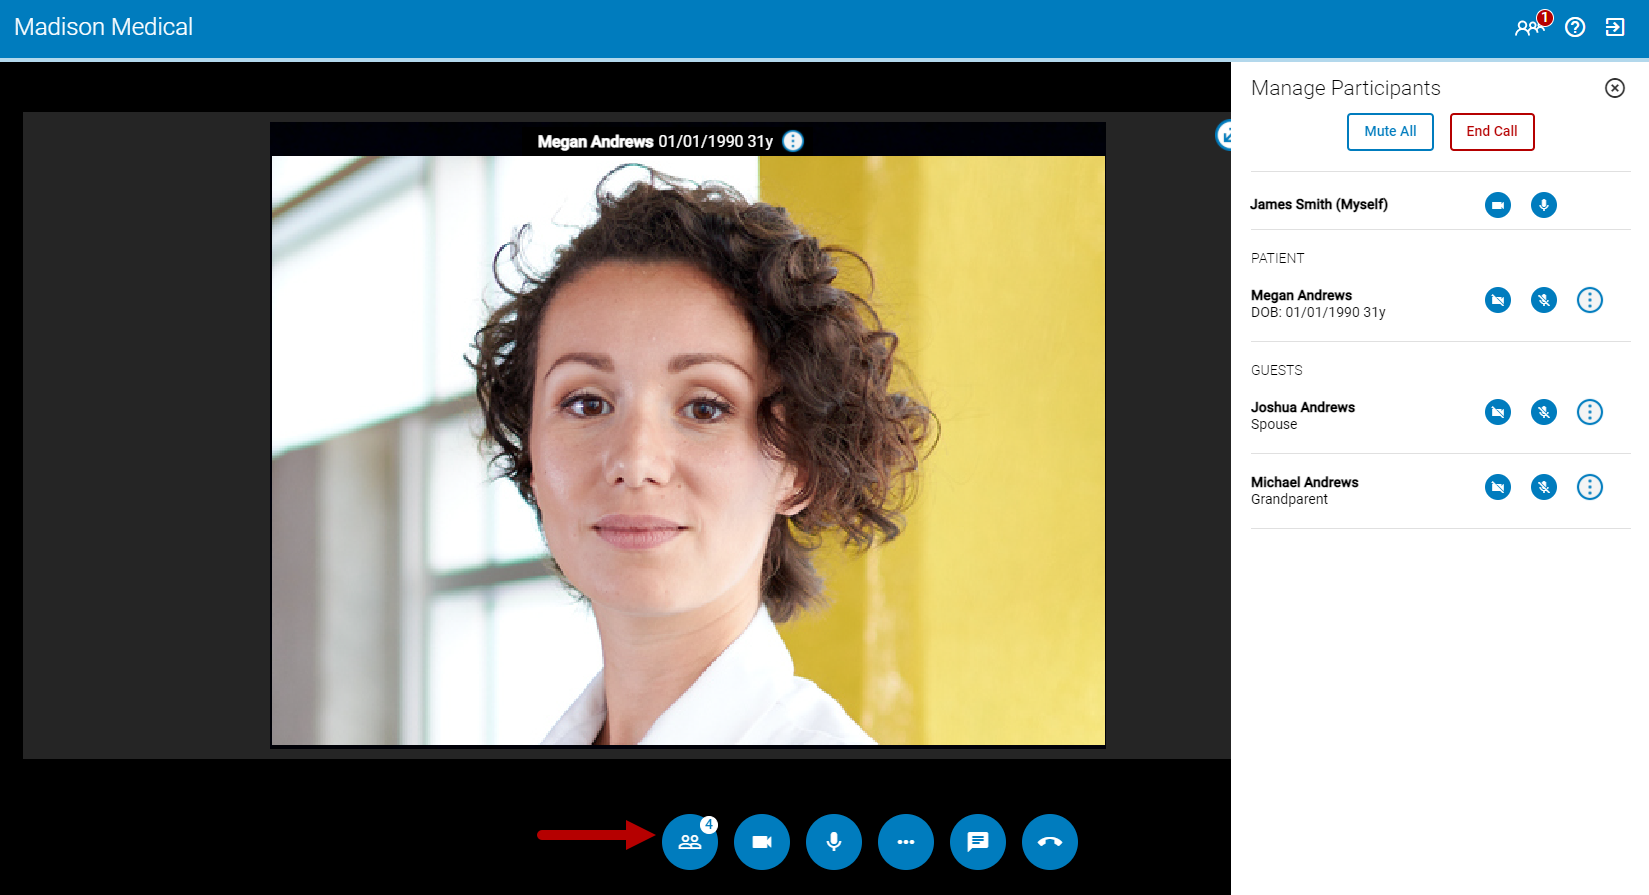
Mute Audio and Turn Off Video
In the panel, you can mute all participants at once, mute individual participants, and turn off participants' video feed.
To mute all participants, select the Mute All button.
To mute an individual participant, select the muted microphone icon ![]() .
.
To turn off an individual participant's video feed, select the disable camera icon ![]() .
.
If a practice user turns off a participant's video feed, only the participant can turn the video feed back on.
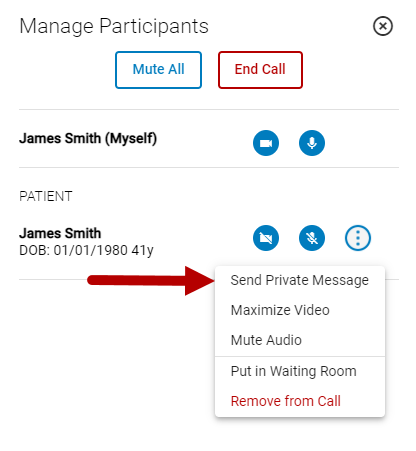
Alternatively, you can mute a participant's audio by selecting the three dots icon ![]() and then selecting Mute Audio (see the graphic below).
and then selecting Mute Audio (see the graphic below).
Send Private Messages
To send a patient or guest a private message, select the three dots icon and then select Send Private Message.
For more information on sending private messages and group messages, see the Chat Your Patient and Guests help topic.
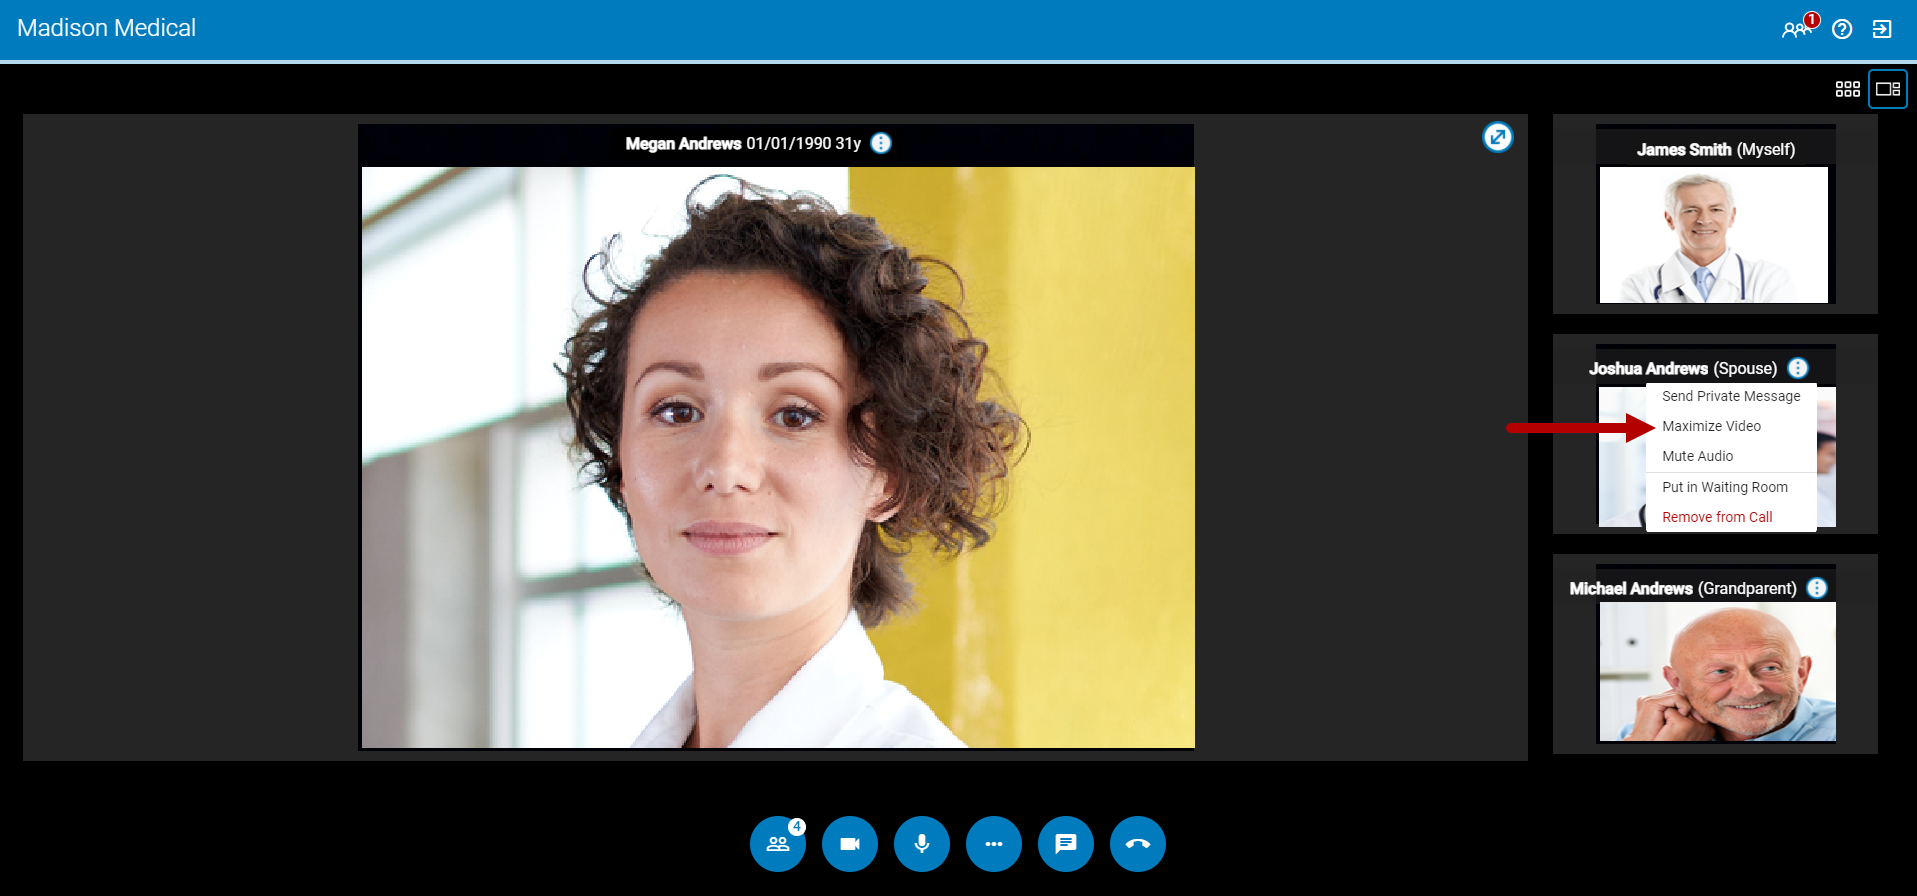
Maximize Video
By selecting Maximize Video on a patient or guest, the patient or guest become the focused participant in the Focused View. See below for more information.
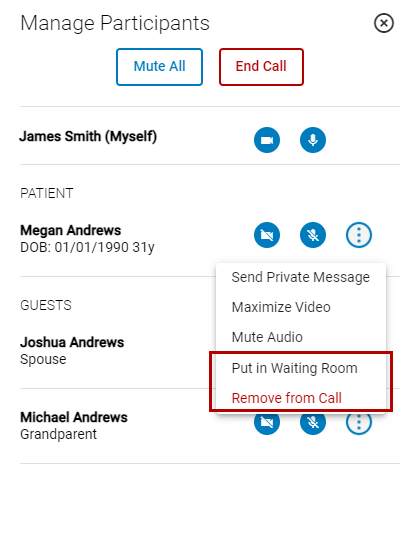
Place In Waiting Room and Remove from Call
To place a participant in the waiting room or remove them from a call, select the three dots icon  and then select either Put in Waiting Room or Remove from Call. You can also end the call for all participants by selecting the End Call button.
You can also place a participant in the waiting room or remove them from the call while in the Maximized, Focused, or Grid View by selecting the three dots icon ![]() and then selecting either Put in Waiting Room or Remove from Call.
and then selecting either Put in Waiting Room or Remove from Call.
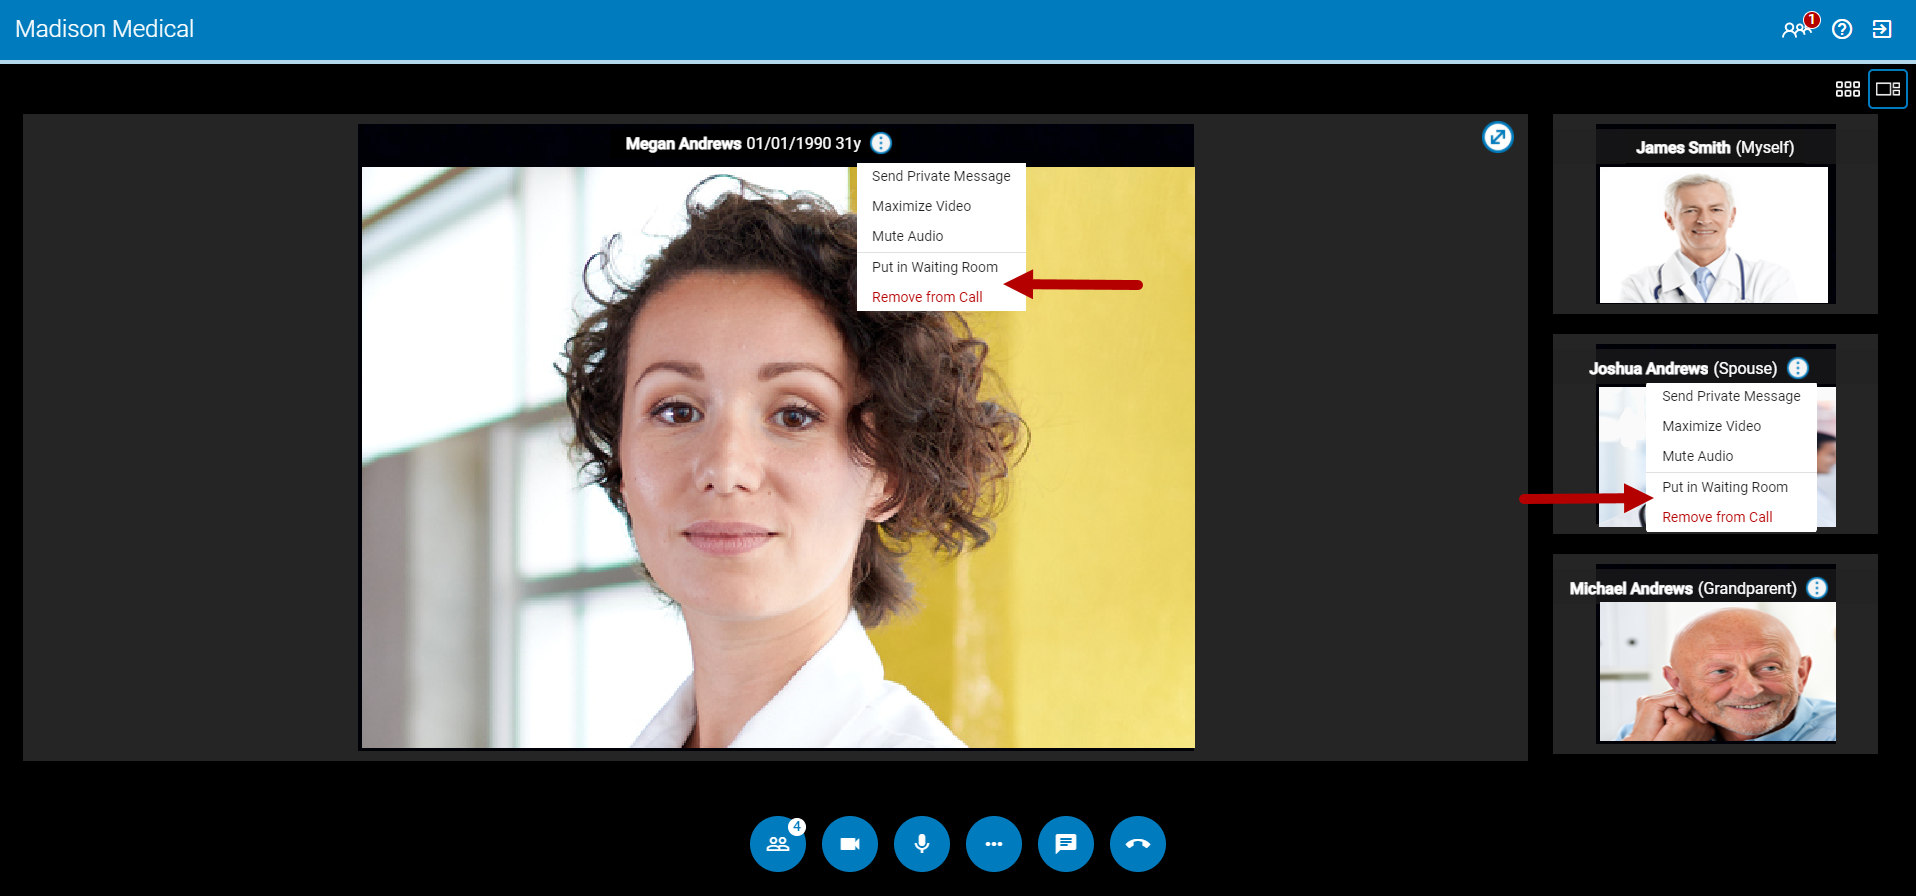
Maximized, Focused, and Grid Views
While in a group call, you are able to select how you want to view and interact with the participants. You can select either a Maximized View, a Focused View, or a Grid View.
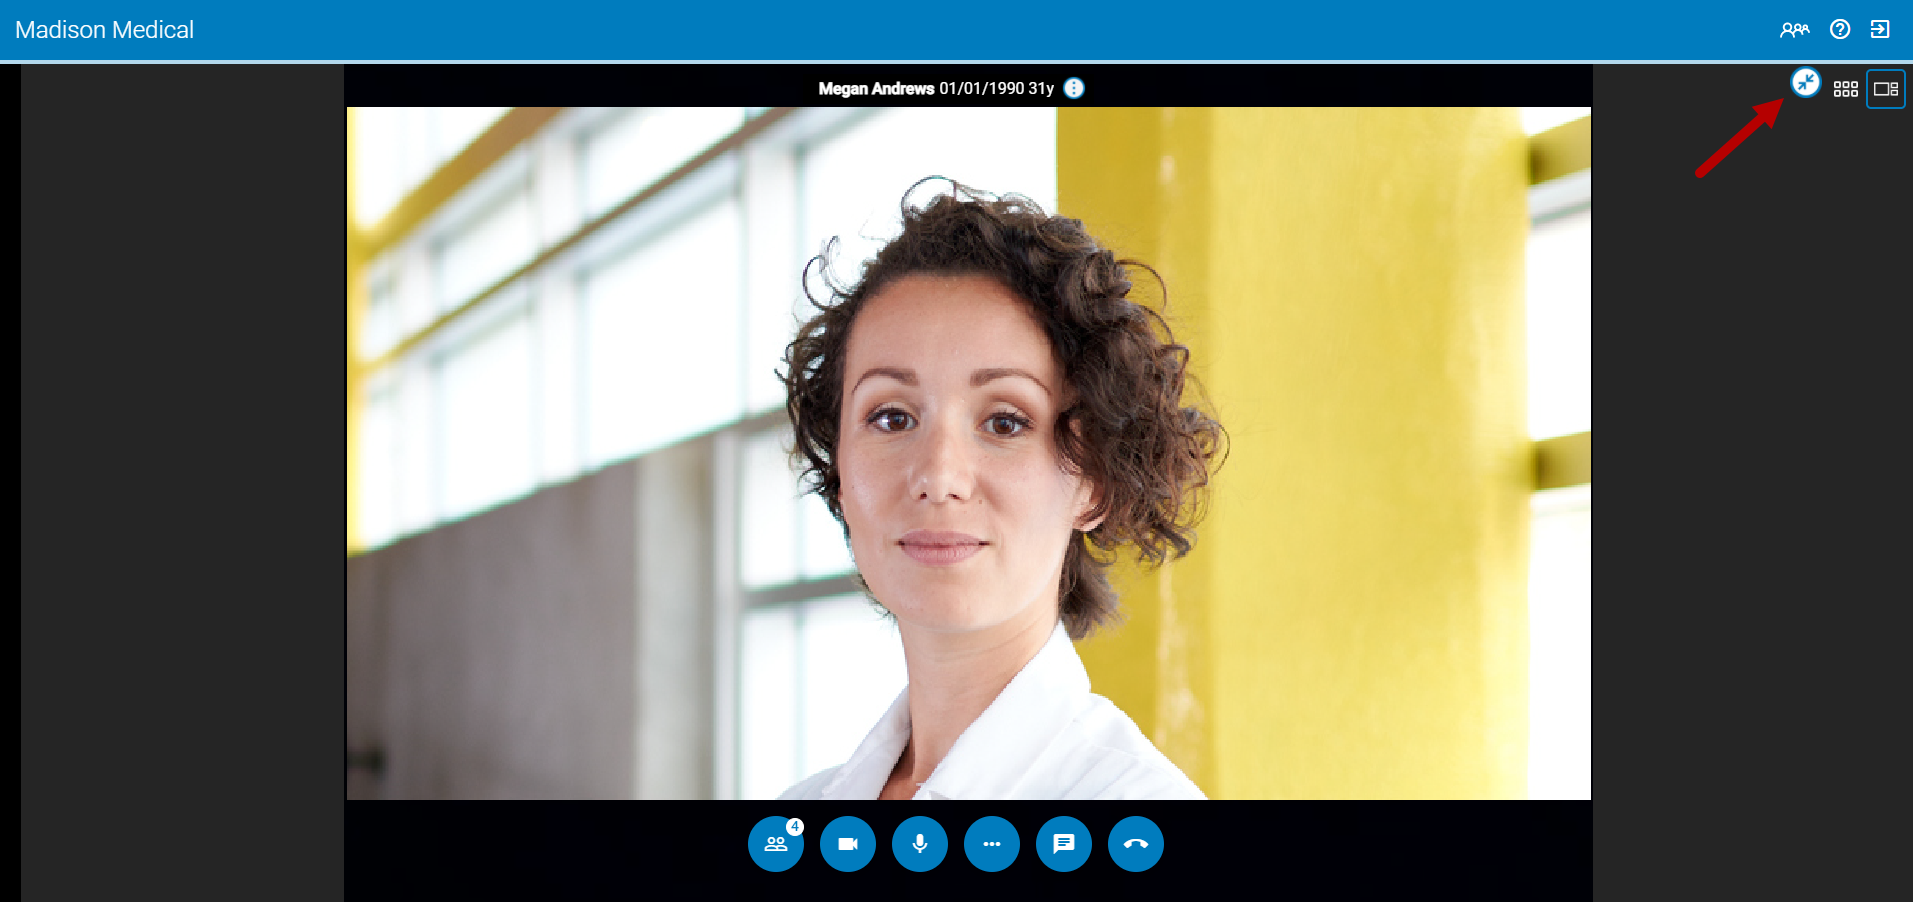
Maximized View
To maximize the participant that is currently in focused view, select the arrow icon ![]() in the upper right-hand corner.
in the upper right-hand corner.
When in maximized view, the other participants are hidden and the participant's window enlarges. To return to the focused view select the arrow icon ![]() .
.
Focused View
To enable Focused View select the ![]() icon above the column of participants.
icon above the column of participants.
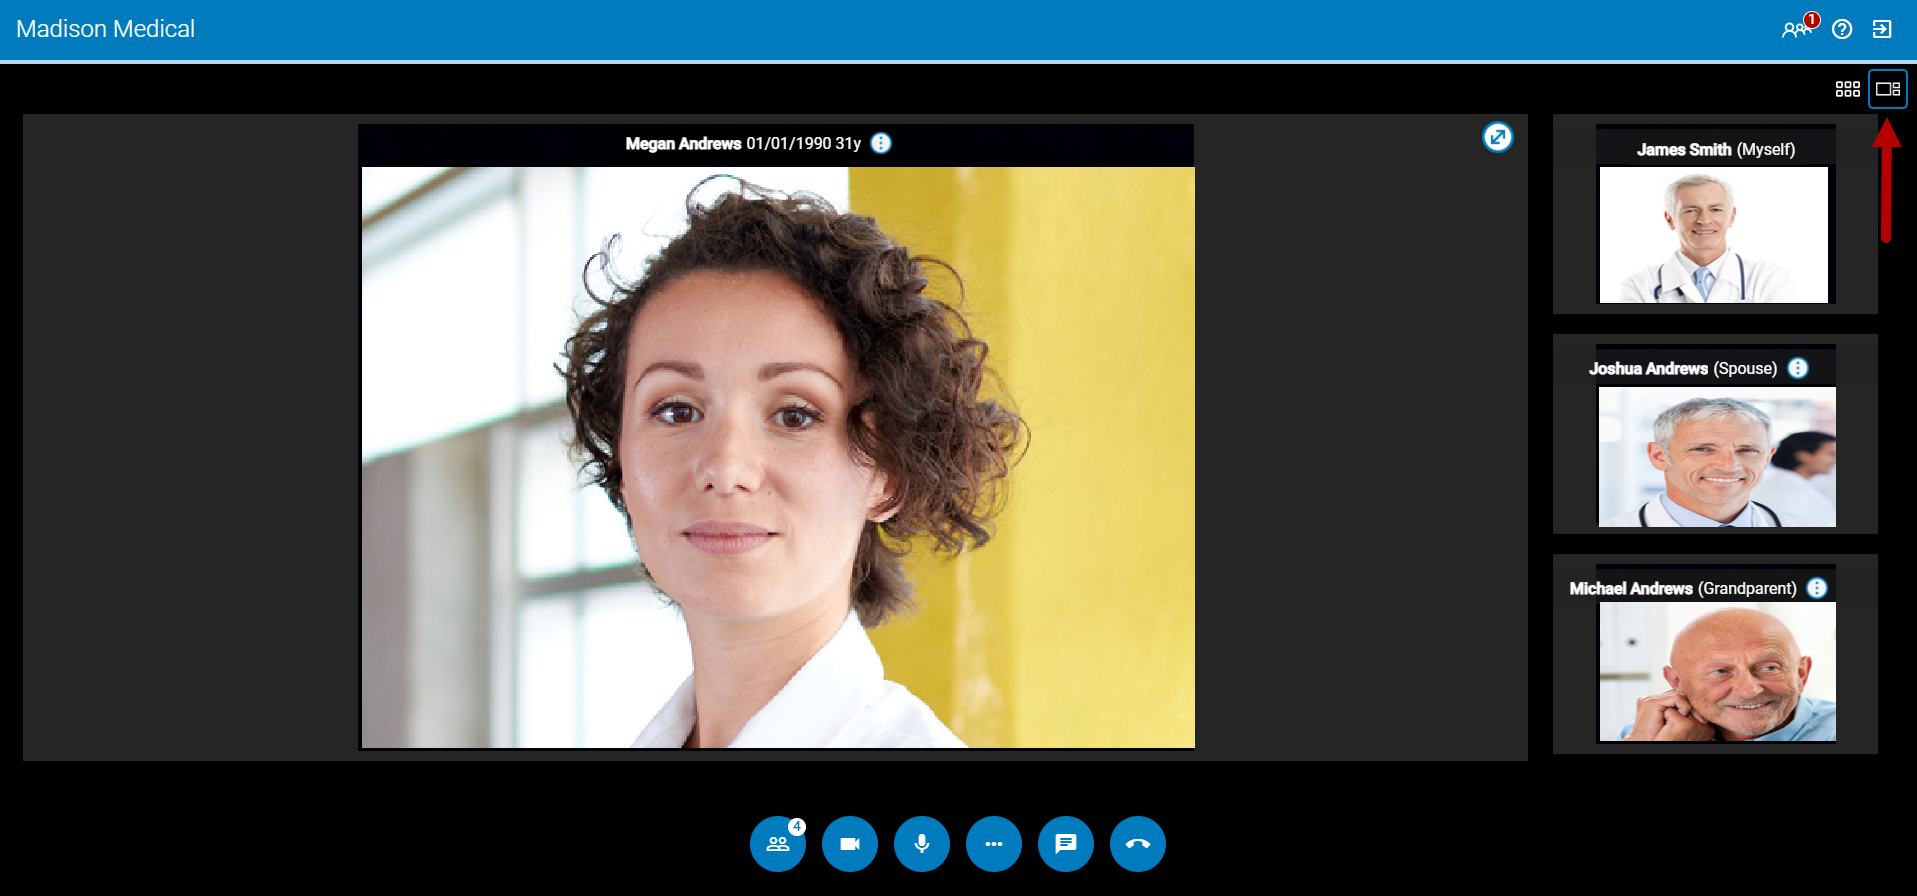
To change which participant is in the focused view, select the three dots icon ![]() next to their name and then select Maximize Video. For example, if you select Maximize Video for Joshua Andrews, then he will be in the focused view and Megan Andrews will display in the right column.
next to their name and then select Maximize Video. For example, if you select Maximize Video for Joshua Andrews, then he will be in the focused view and Megan Andrews will display in the right column.
Grid View
To enable Grid View select the ![]() icon above the column of participants.
icon above the column of participants.

Waiting Room Panel and Indicator
While in a virtual visit with your patients and guests, the number of patients in your waiting room displays in the upper right corner of the window. This number does not include the number of guests in your waiting room.
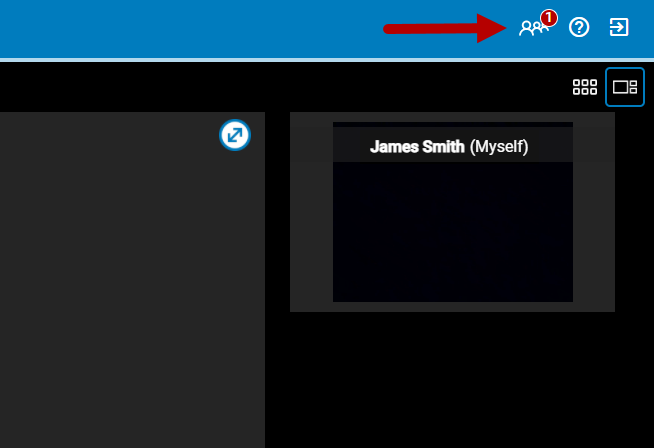
To view which patients and guests are currently in your waiting room, add patients and guests to a call, and remove patients and guests from the waiting room queue, select the ![]() icon.
icon.
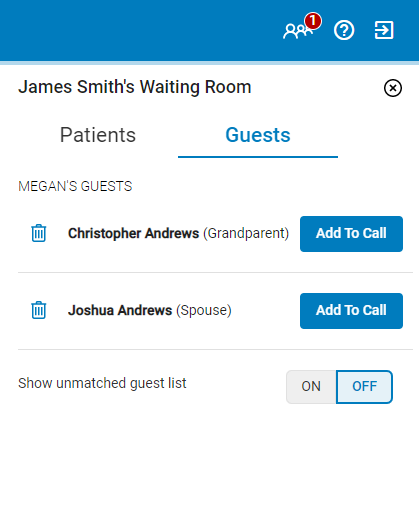
For more information on adding guests to a virtual visit, see the Group Telehealth Calls topic.
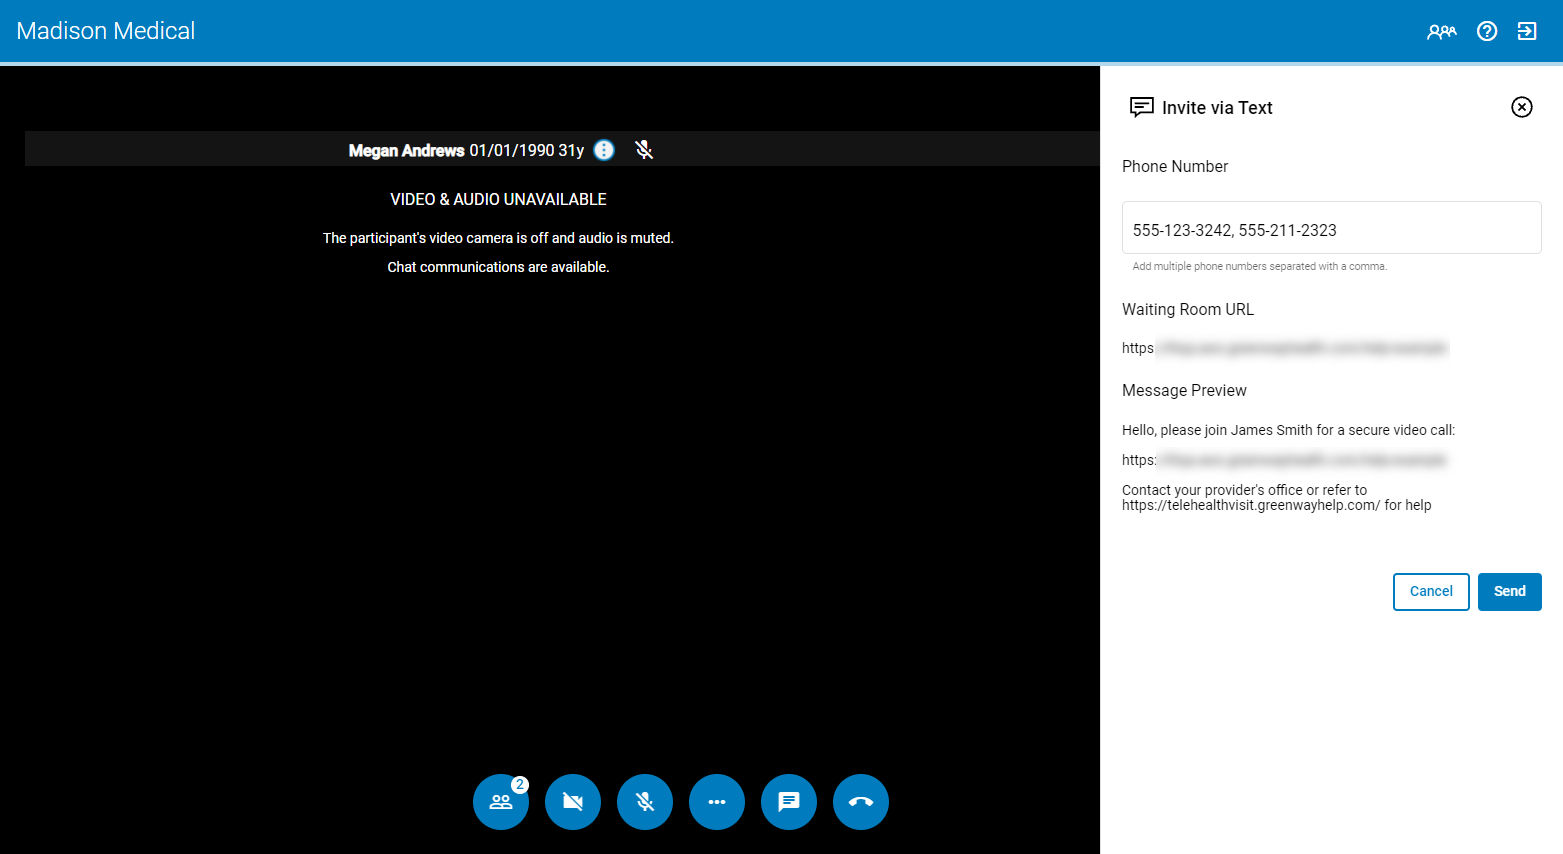
Invite Participants from a Virtual Visit
To send invites via email or text message from your virtual waiting room, open the Manage Participants panel and then select either the email or text message icon to open the Invite via Email or Invite via Text window. See below for details.
The subject line of the email and text message will be in the following format: "Telehealth meeting invitation from [provider name]".
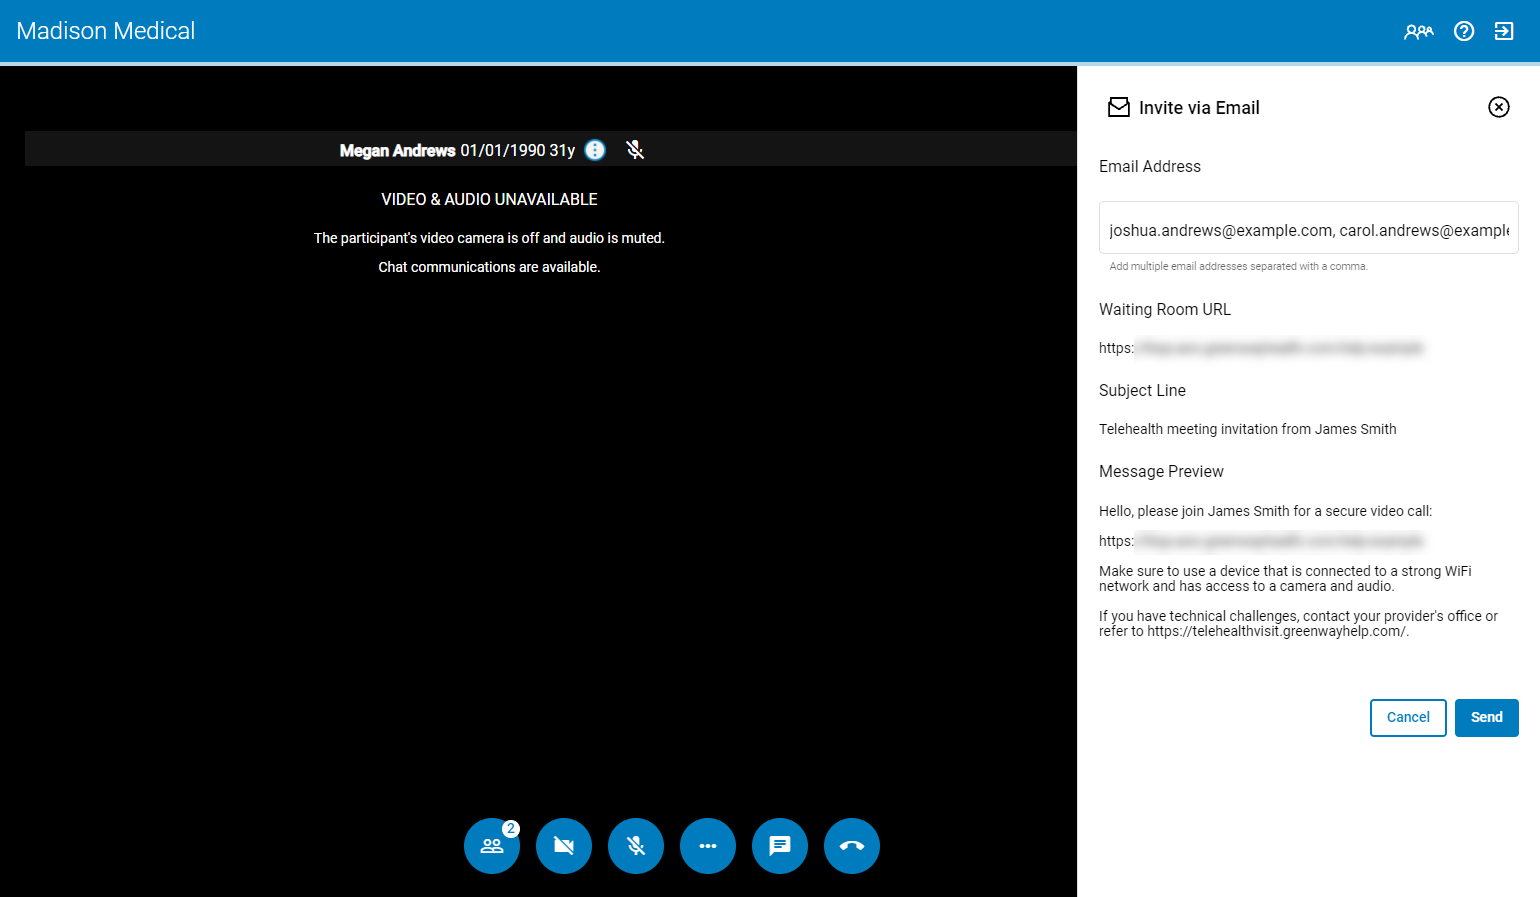
Invite via Email
To send an invite via email while in a virtual visit, select Manage Participants button![]() and then select the invite via Email icon
and then select the invite via Email icon ![]() . In the Invite via Email panel, enter a valid email address or addresses. After selecting Send, the email recipients will receive a canned email as shown under Message Preview. To send an invite to multiple email address at once, add multiple email addresses and separate each email address with a comma.
. In the Invite via Email panel, enter a valid email address or addresses. After selecting Send, the email recipients will receive a canned email as shown under Message Preview. To send an invite to multiple email address at once, add multiple email addresses and separate each email address with a comma.
The maximum number of email addresses is 10 per message.
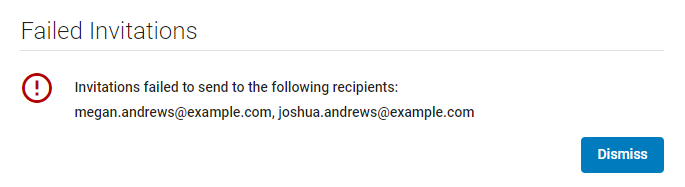
If one or more of the email invitations failed to send, a window shows the email addresses that failed to send.
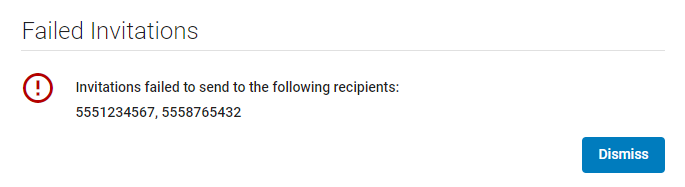
Invite via Text
To send an invite via text message while in a virtual visit, select the Manage Participants button![]() and then select the Invite via Text icon
and then select the Invite via Text icon ![]() . In the Invite via Text panel, enter a valid phone number or phone numbers. To send an invite to multiple phone numbers at once, add multiple phone numbers and separate each number with a comma. After selecting Send, the text message recipient will receive a canned text message as shown under Message Preview.
. In the Invite via Text panel, enter a valid phone number or phone numbers. To send an invite to multiple phone numbers at once, add multiple phone numbers and separate each number with a comma. After selecting Send, the text message recipient will receive a canned text message as shown under Message Preview.
The maximum number of phone numbers is 10 per message.
If one or more of the text message invitations fail to send, a window shows the phone numbers that failed to send.
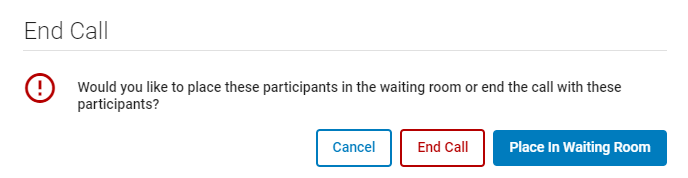
Ending a Visit
In addition to using the Manage Participants panel to end a virtual visit, you can also end a visit with your patient by either selecting the phone icon or by closing the browser tab or window where your visit took place.
If you select the phone icon, you will see the following prompt. Select End Call to return to your waiting room, or to return to your waiting room and place your patient in the waiting room queue select Place in Waiting Room. To cancel and return to the virtual visit, select Cancel.
If you close your browser tab or window, you will have to sign back into your virtual waiting room.
After ending your visit, your patient will see the following message on their screen.

A patient can return to your waiting room by selecting the Return to waiting room button if the patient or you did not mean to end the call.
Due to recent versions of iOS, if you close the browser window in an iPhone, the patient's screen will be frozen for about 30 seconds. The patient will remain in your waiting room until the patient ends the call.
Additional Information
Picture-in-Picture
When used with Google Chrome or Microsoft Edge on a single screen, Greenway Telehealth™ users can leverage the picture-in-picture (PIP) feature of the browser to pin the patient video feed in the foreground for continuous eye contact with full EHR real estate. See the Picture-in-Picture with Google Chrome or Microsoft Edge help topic for more information.
The picture-in-picture functionality is a feature of Google Chrome and Microsoft Edge and is not a Greenway Telehealth™ supported feature.
Full Screen
To enter full screen mode while in a virtual visit:
Right-click in the browser and then select Show Controls. To enter full screen mode, double-click in the browser window. To exit full screen, select Esc on your keyboard or select the ![]() icon or the
icon or the ![]() icon (Mozilla Firefox) in the left corner of your window.
icon (Mozilla Firefox) in the left corner of your window.
The Full Screen mode is a feature of Google Chrome, Microsoft Edge, and Mozilla Firefox and is not a Greenway Telehealth™ supported feature.
Video Controls
While you are able to display video controls in your browser window by right-clicking and then selecting Show Controls, the controls are only accessible in full-screen mode. If you select the pause icon, you will only pause your live video of the patient and will have no impact on your patient's video call. Your patient will continue to see your live video.
The functionality is a feature of web browsers and is not a Greenway Telehealth™ supported feature.

