Group telehealth calls allow practices to conduct virtual visits with a single patient and guests. While in a group call, practice users are able to mute participants' audio and video, send participants private messages, select how they want to view and interact with call participants, and remove and add participants.
Guest Check in to a Group Call
Guests can check in any time before or during a patient's appointment and will be placed in the virtual waiting room until a practice user grants access to the call.
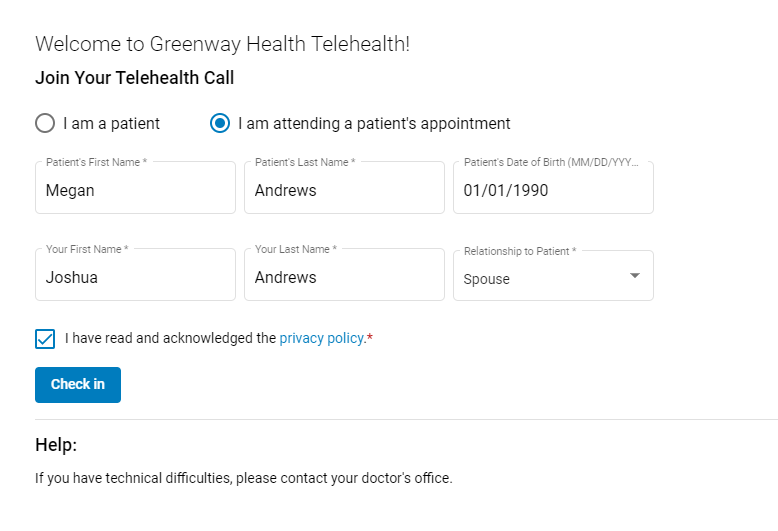
A guest checking in will:
| 1. | Select the I am attending a patient's appointment radio button. |
| 2. | Enter the patient's first and last name, and date of birth. |
| 3. | Enter their first and last name and then select an option from the Relationship to Patient dropdown. These options include: Parent, Sibling, Child, Guardian, Grandparent, Partner, Spouse, Case Manager, Friend, Translator, and Other. |
| 4. | Acknowledge the privacy policy by selecting the checkbox for "I have read and acknowledged the privacy policy". |
| 5. | Select Check in when finished. |
Patients will check in to a virtual visit as they normally would. See the Virtual Visit Check-In topic for more information.
Start a Group Call from the Waiting Room
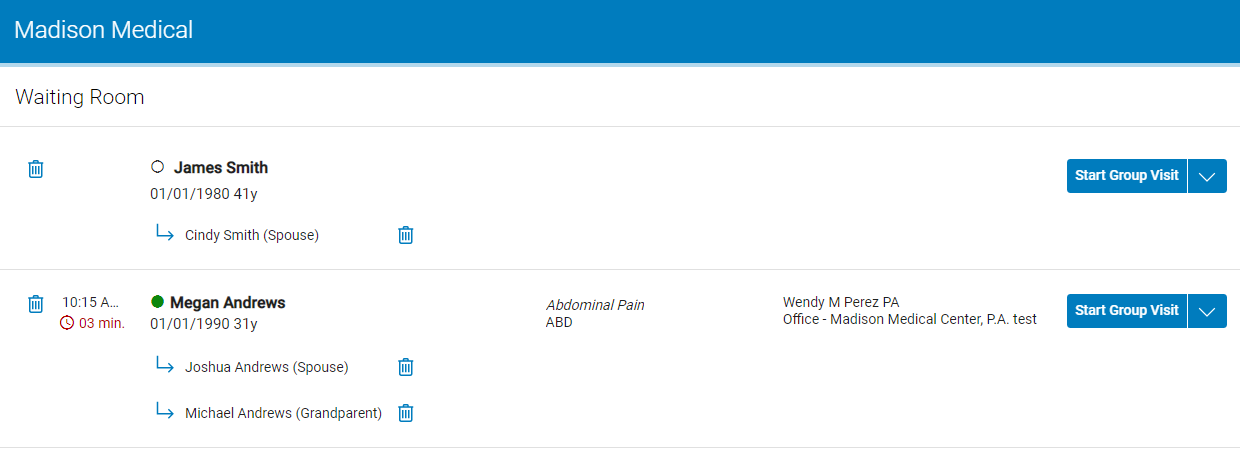
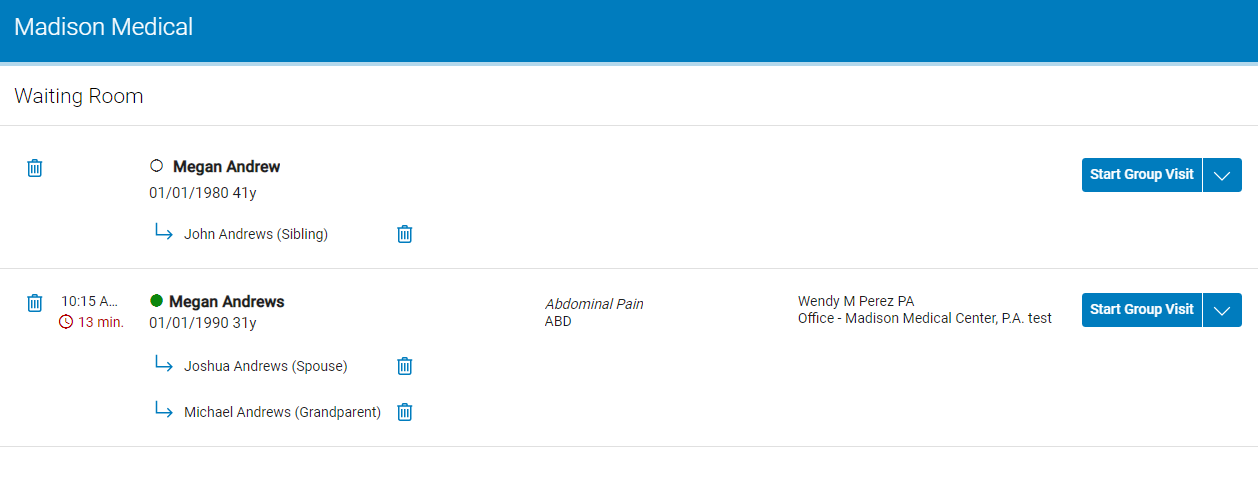
After a patient and the patient's guests check in, their names will appear in the virtual waiting room.
If a patient checks in, a green circle appears next to the checked in patient's name. If a guest arrives before the patient and the patient has not checked in, an empty circle appears next to the patient's name. In the example below, Cindy Smith checked in prior to James Smith.
Guests' first and last name and the relationship to the patient appear under the patient's name in the waiting room queue.
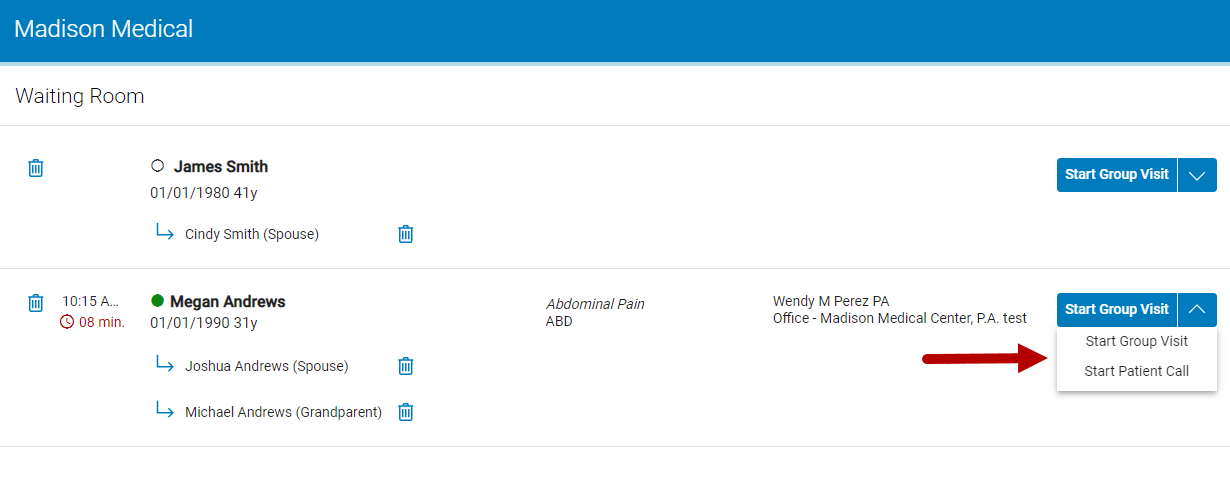
To start a call with a patient and guests, select the Start Group Visit button or select the drop down and then select Start Group Visit.
To start a call with the patient only, select the drop down and then select Start Patient Call.
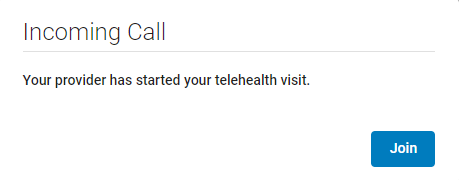
After selecting either Start Group Visit or Start Patient Call, patients and guests will need to select Join in the prompt in order for them to access the virtual visit.
After selecting Join, patients and guests will see the Check Audio & Video Settings window. In this window, they can test their speaker, microphone, and camera, and change each of these to a different device if necessary. After making modifications, they will need to select the Join Call button to join the virtual visit.
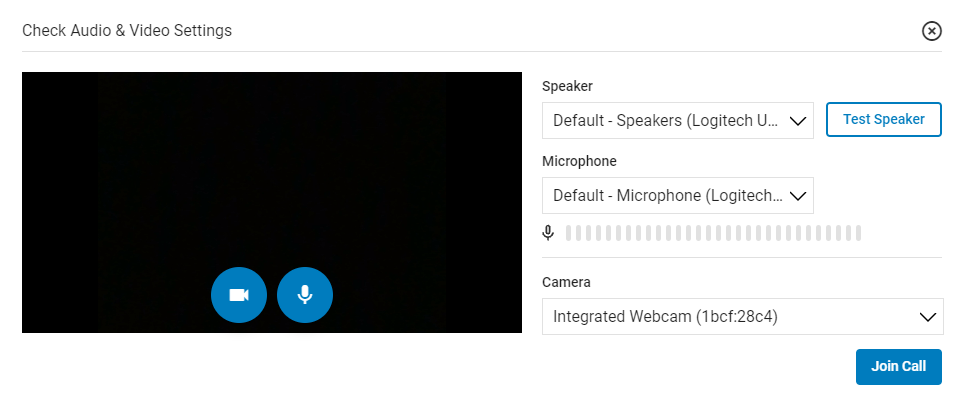
For more information on the Check Audio & Video Settings window, see the Check Audio & Video Settings section of the Virtual Visit help topic.
Remove Patients and Guests from the Waiting Room Queue
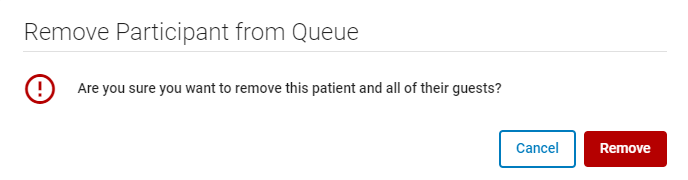
To remove a patient and all of their guests from the waiting room queue, select the trash can icon  next to the patient's name. In the prompt, select Remove.
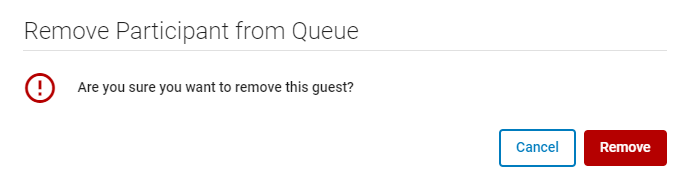
To remove only a guest from the waiting room queue, select the trash can icon next to the guest's name. In the prompt, select Remove.
Add a Guest to an Existing Patient Call
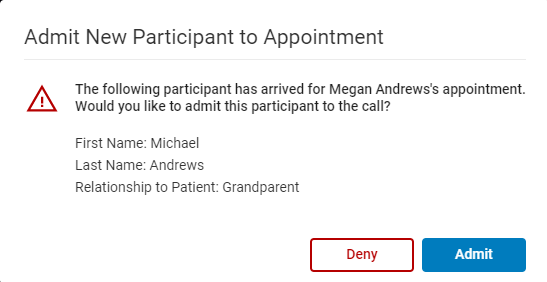
Sometimes, a guest may check in after you have started a call with a patient. When a guest does check in after a call has started, you can admit or deny the new participant by selecting Deny or Admit in the prompt.
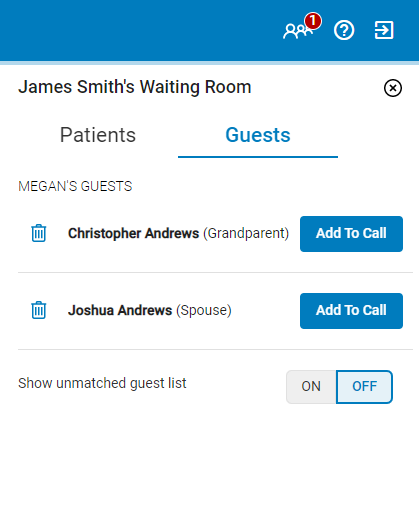
If you select Deny in the prompt above or if you select Start Patient Call when initiating a call, you can add checked-in participants to the call by selecting the ![]() icon in the upper right corner of the virtual call window and then selecting the Guests tab.
icon in the upper right corner of the virtual call window and then selecting the Guests tab.
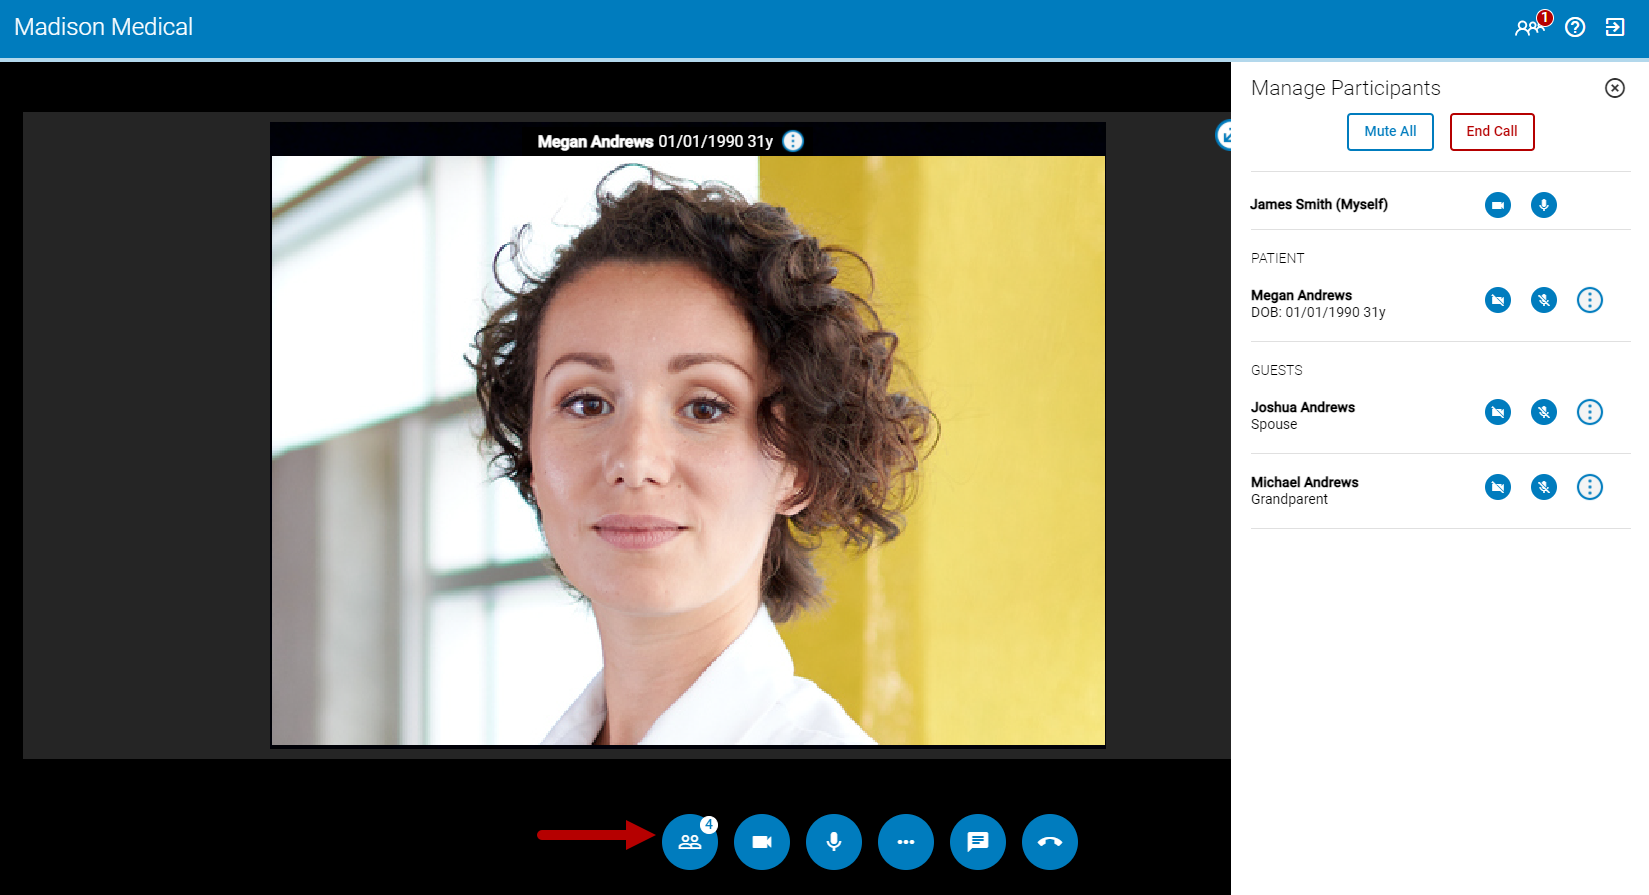
The number of patients checked in to your virtual waiting room displays in red on the people icon ![]() . This displays for group calls and non-group calls.
. This displays for group calls and non-group calls.
In the Guests list, select the Add To Call button to add a guest to the current virtual visit.
A guest will appear in this list only if the guest enters the patients First and Last Name, and Date of Birth correctly when checking in. Otherwise, the guest will appear in the Unmatched Guest list (see below).
Adding Unmatched Guests
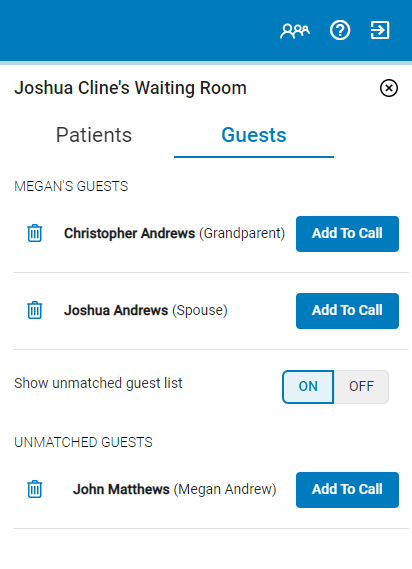
In some cases, a guest may not know a patient's date of birth, enter the wrong date of birth, may misspell a patient's name, or merely enter the wrong information. In these instances, the guest appears in a separate row in the waiting room queue than the correct patient.
In the example below, the guest "John Andrews" misspelled the patient's last name and entered the wrong birth date. In this case, "John Andrews" appears under the patient's misspelled name in a separate row from the correct patient.
If you select the Start Visit button (which displays if no guests have checked in) or if you select the Start Group Visit, the guest appears in the Unmatched Guest list in the Guests tab when toggled on. All guests that are not matched with the current patient, will display in the Unmatched Guest list.
To add an unmatched guest to a call, select the Add to Call button. To remove a guest select the trash can icon .
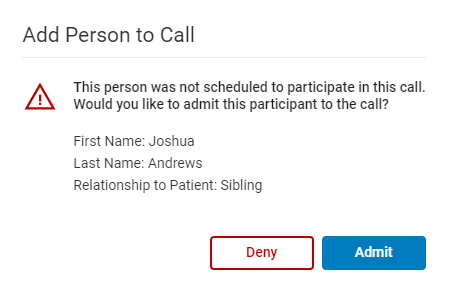
In the Add Person to Call window, select Admit to admit the participant to the call or Deny to refuse admittance.
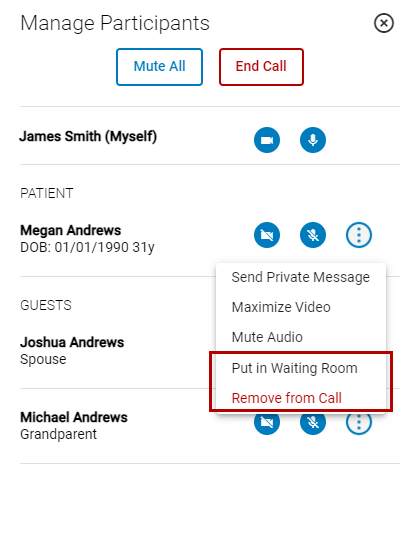
Managing Participants
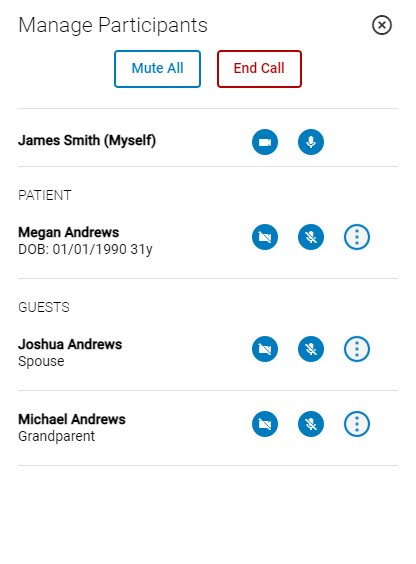
In the Manage Participants panel, users are able to mute participants audio and turn off their video, send private messages, place participants in the waiting room, or remove them from the call.
To access the Manage Participants panel select the ![]() icon.
icon.
The number on the icon indicates the number of participants in the call including the practice user.
Mute Audio and Turn Off Video
In the panel, you can mute all participants at once, mute individual participants, and turn off participants' video feed.
To mute all participants, select the Mute All button.
To mute an individual participant, select the muted microphone icon ![]() .
.
To turn off an individual participant's video feed, select the disable camera icon ![]() .
.
If a practice user turns off a participant's video feed, only the participant can turn the video feed back on.
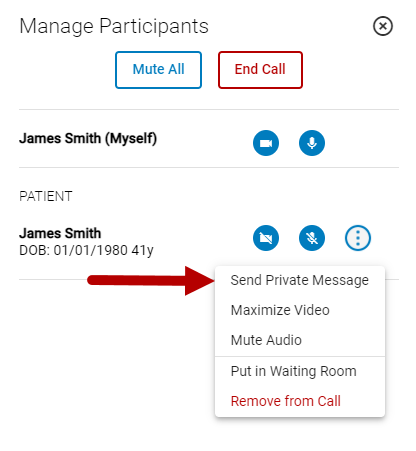
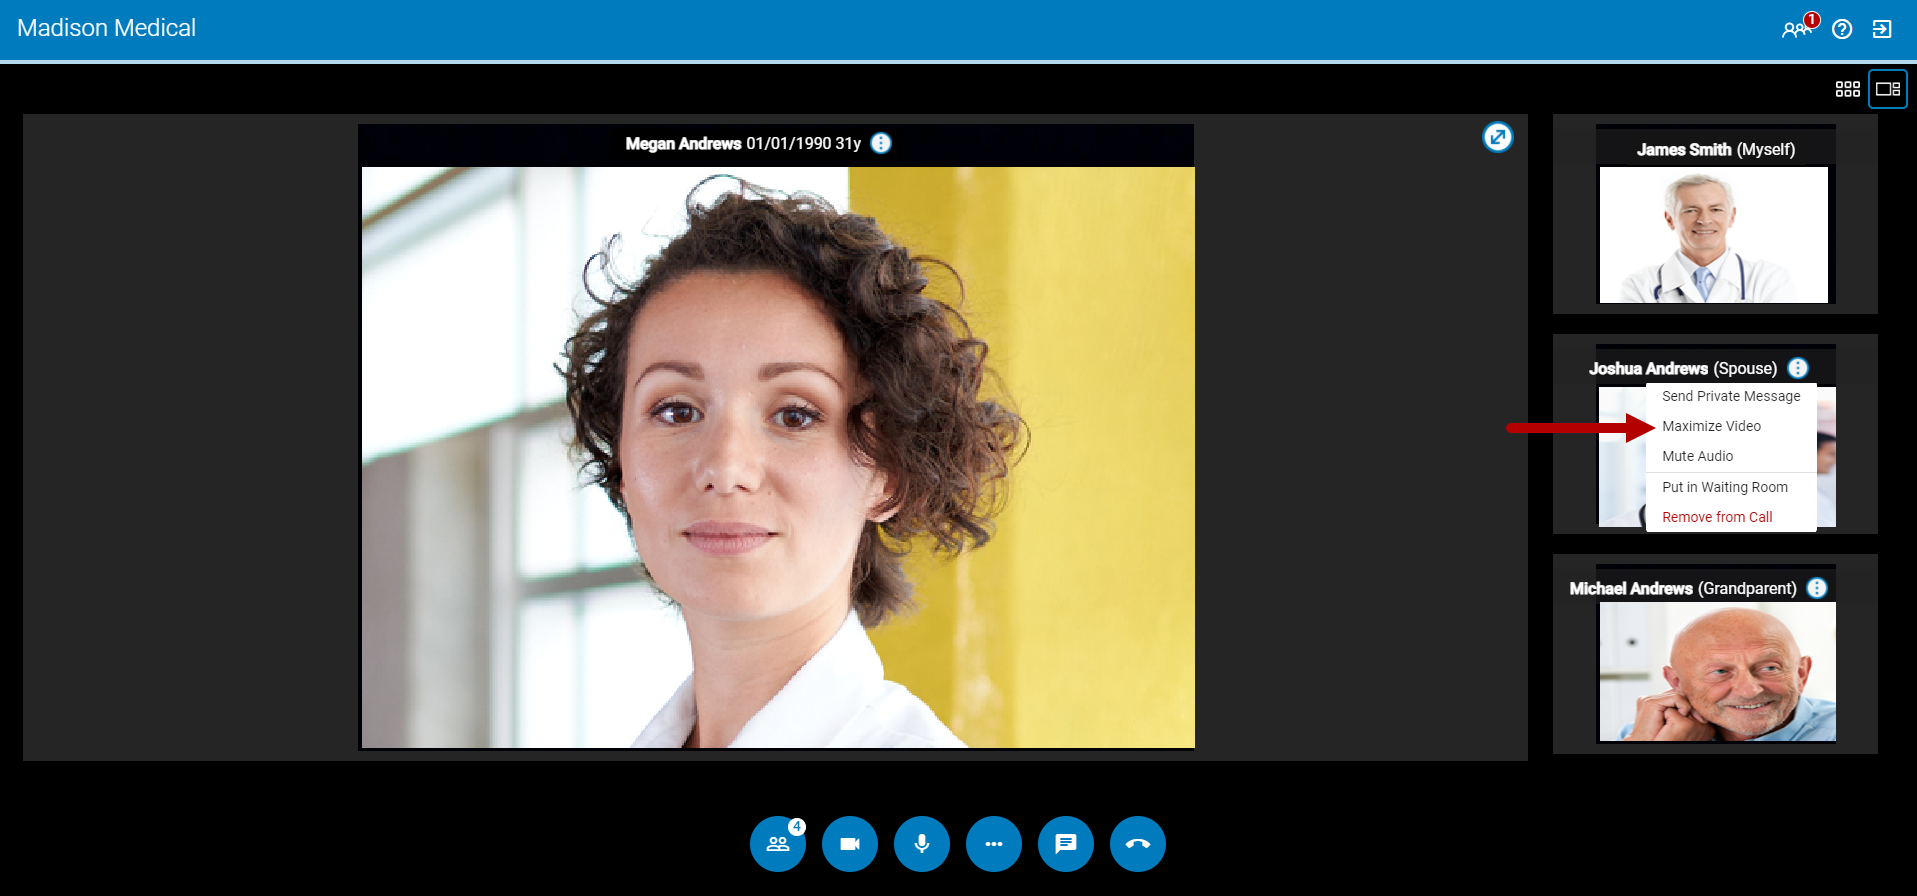
Alternatively, you can mute a participant's audio by selecting the three dots icon ![]() and then selecting Mute Audio (see the graphic below).
and then selecting Mute Audio (see the graphic below).
Send Private Messages
To send a patient or guest a private message, select the three dots icon ![]() and then select Send Private Message.
and then select Send Private Message.
This isn't the only way to send a patient or guest a private message. See below for additional information.
Maximize Video
By selecting Maximize Video on a patient or guest, the patient or guest become the focused participant in the Focused View. See below for more information.
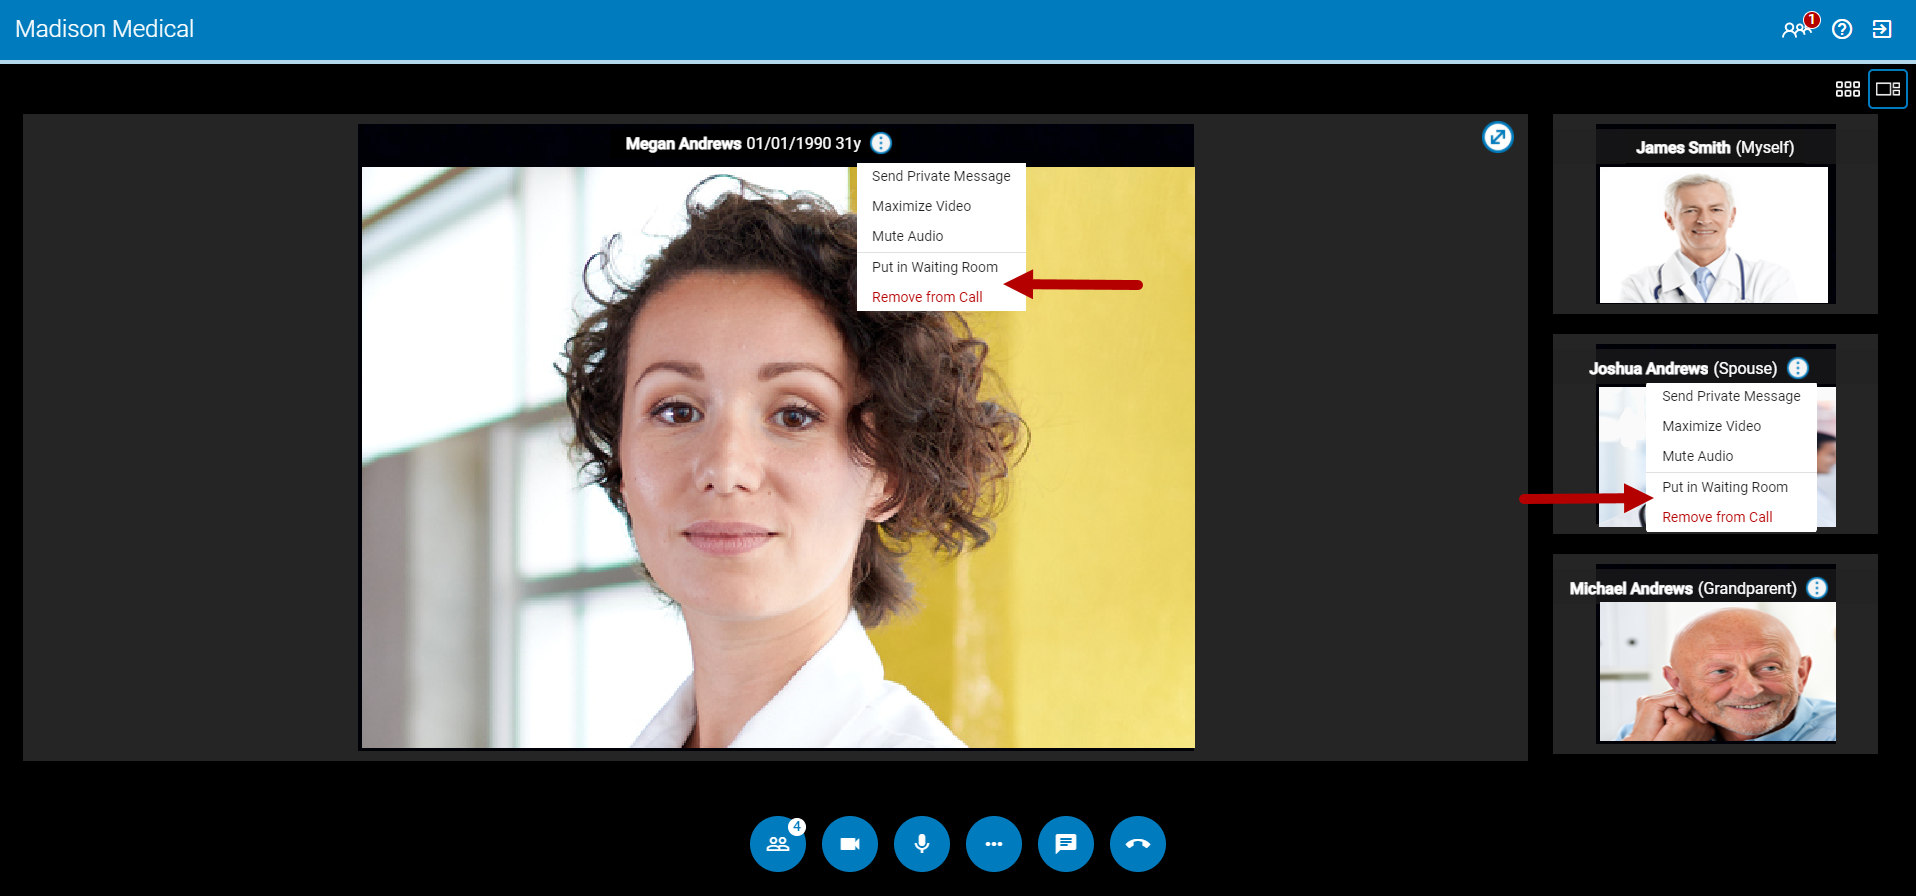
Place In Waiting Room and Remove from Call
To place a participant in the waiting room or remove them from a call, select the three dots icon ![]() and then select either Put in Waiting Room or Remove from Call. You can also end the call for all participants by selecting the End Call button.
and then select either Put in Waiting Room or Remove from Call. You can also end the call for all participants by selecting the End Call button.
You can also place a participant in the waiting room or remove them from the call while in the Maximized, Focused, or Grid View by selecting the three dots icon ![]() and then selecting either Put in Waiting Room or Remove from Call.
and then selecting either Put in Waiting Room or Remove from Call.
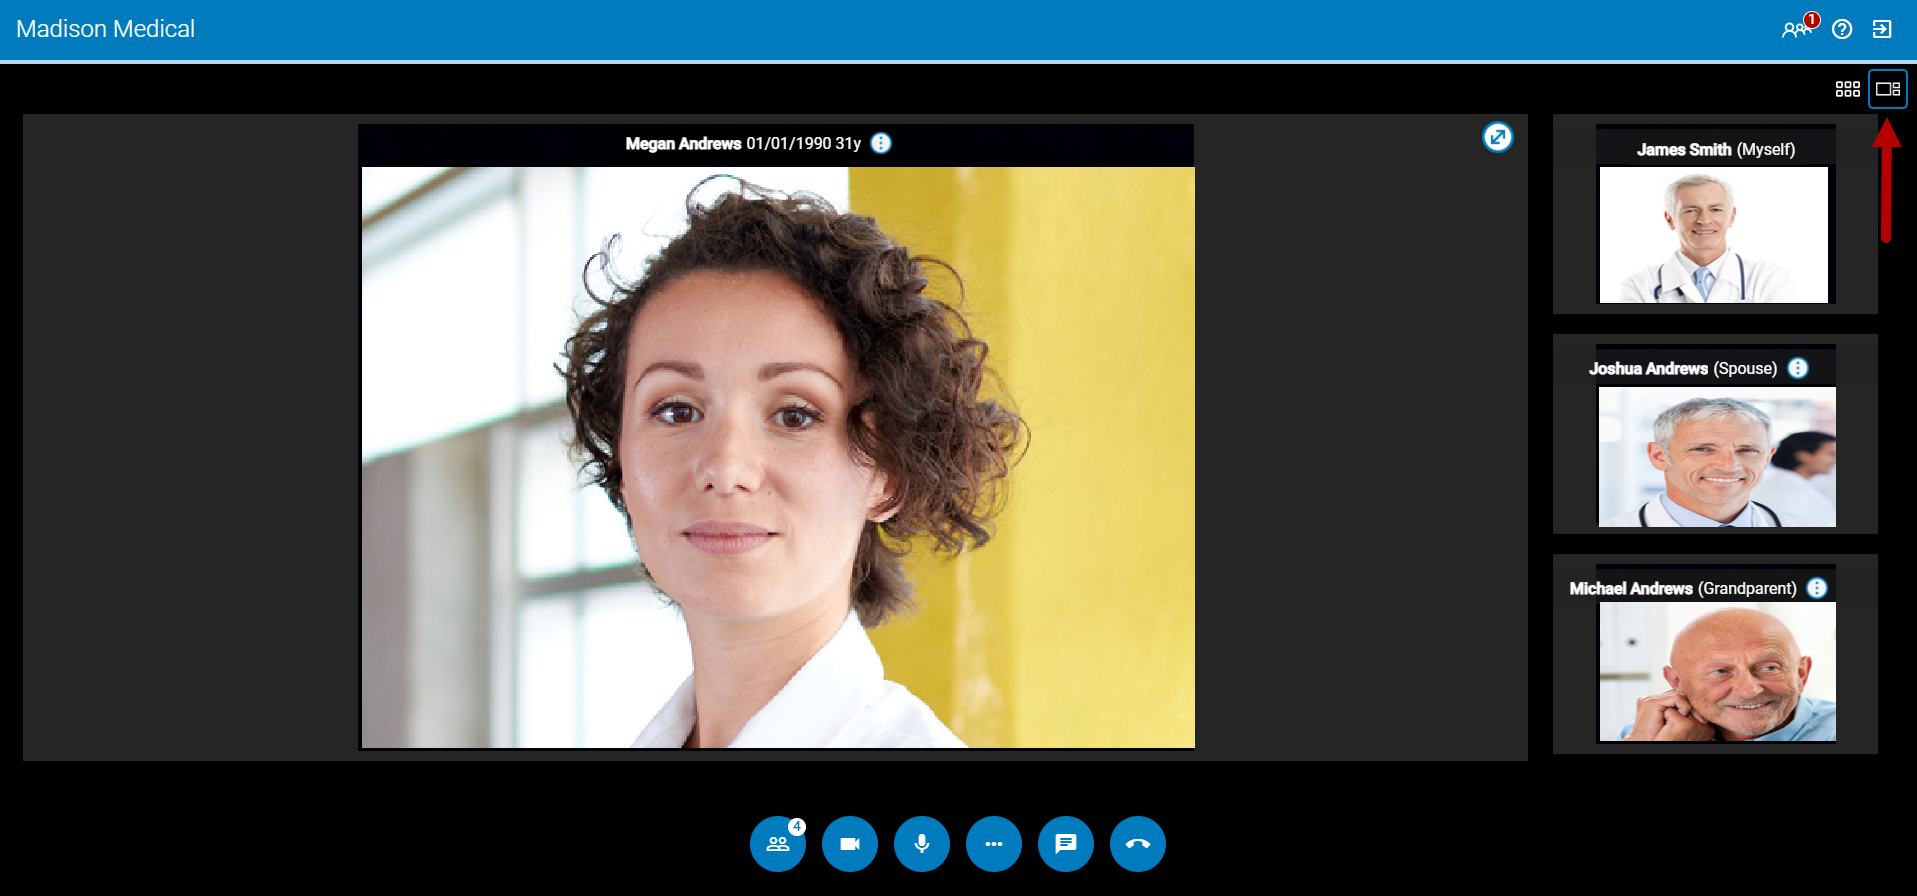
Maximized, Focused, and Grid Views
While in a group call, you are able to select how you want to view and interact with the participants. You can select either a Maximized View, a Focused View, or a Grid View.
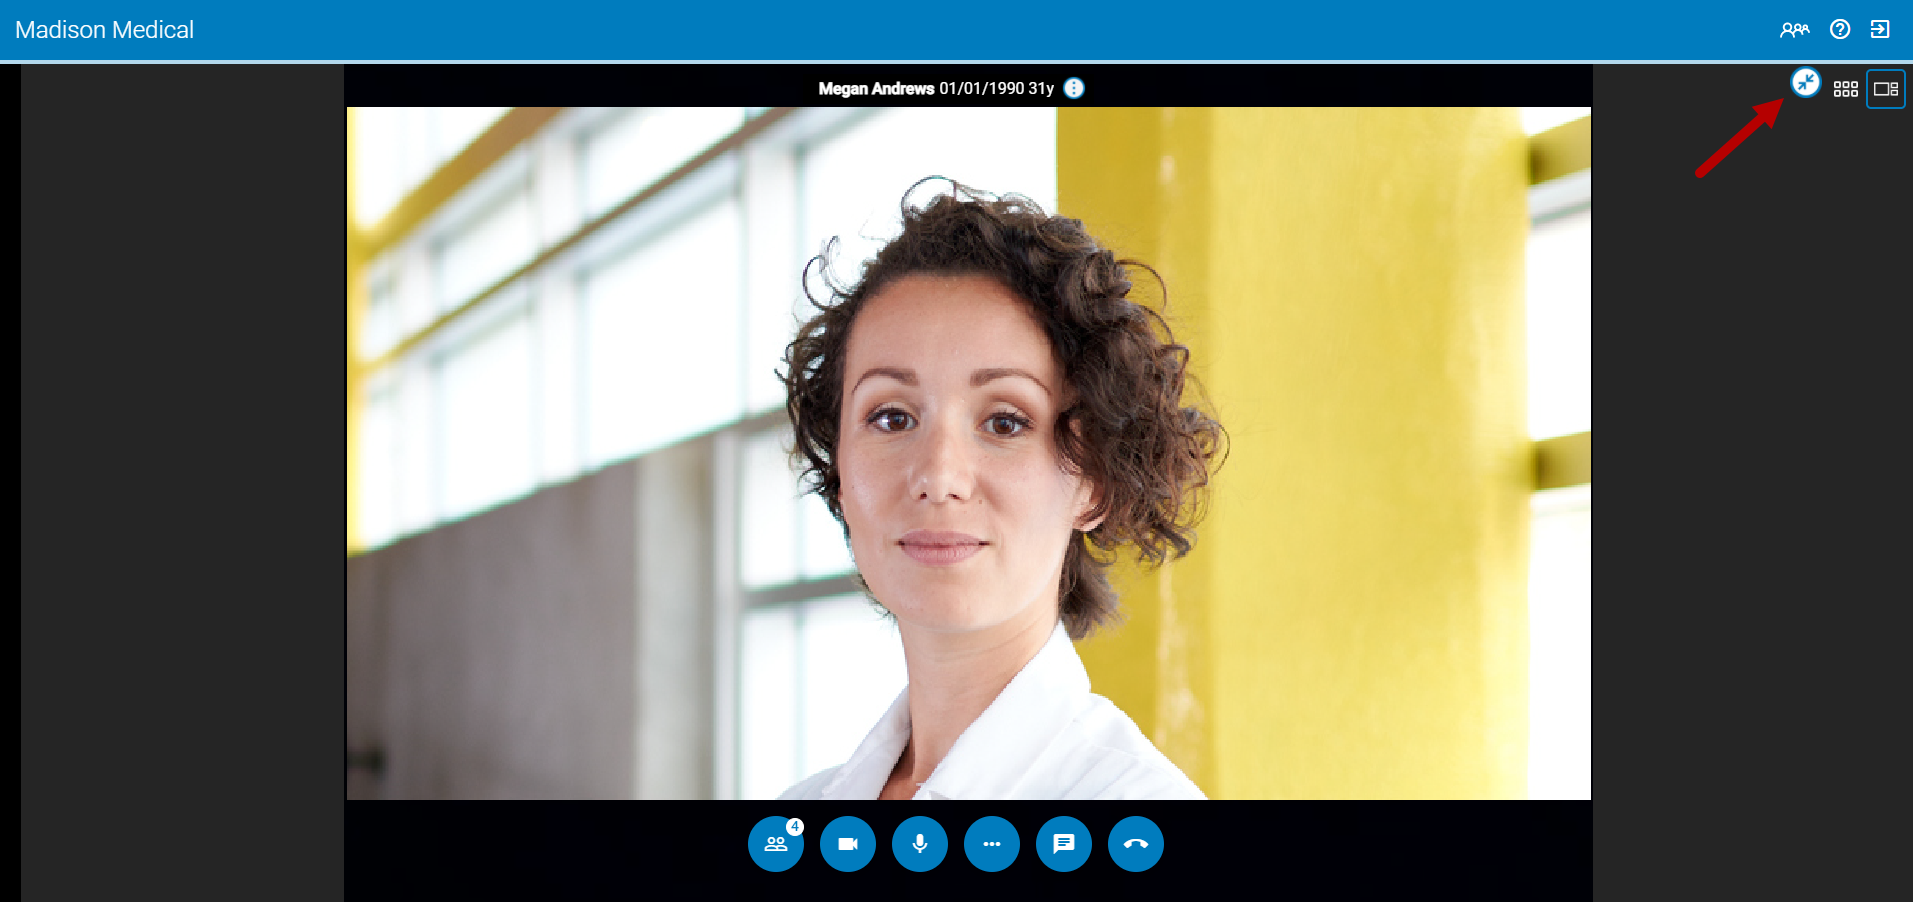
Maximized View
To maximize the participant that is currently in focused view, select the arrow icon ![]() in the upper right-hand corner.
in the upper right-hand corner.
When in maximized view, the other participants are hidden and the participant's window enlarges. To return to the focused view select the arrow icon ![]() .
.
Focused View
To enable Focused View select the ![]() icon above the column of participants.
icon above the column of participants.
To change which participant is in the focused view, select the three dots icon ![]() next to their name and then select Maximize Video. For example, if you select Maximize Video for Joshua Andrews, then he will be in the focused view and Megan Andrews will display in the right column.
next to their name and then select Maximize Video. For example, if you select Maximize Video for Joshua Andrews, then he will be in the focused view and Megan Andrews will display in the right column.
Grid View
To enable Grid View select the ![]() icon above the column of participants.
icon above the column of participants.

Message your Patient and Guests
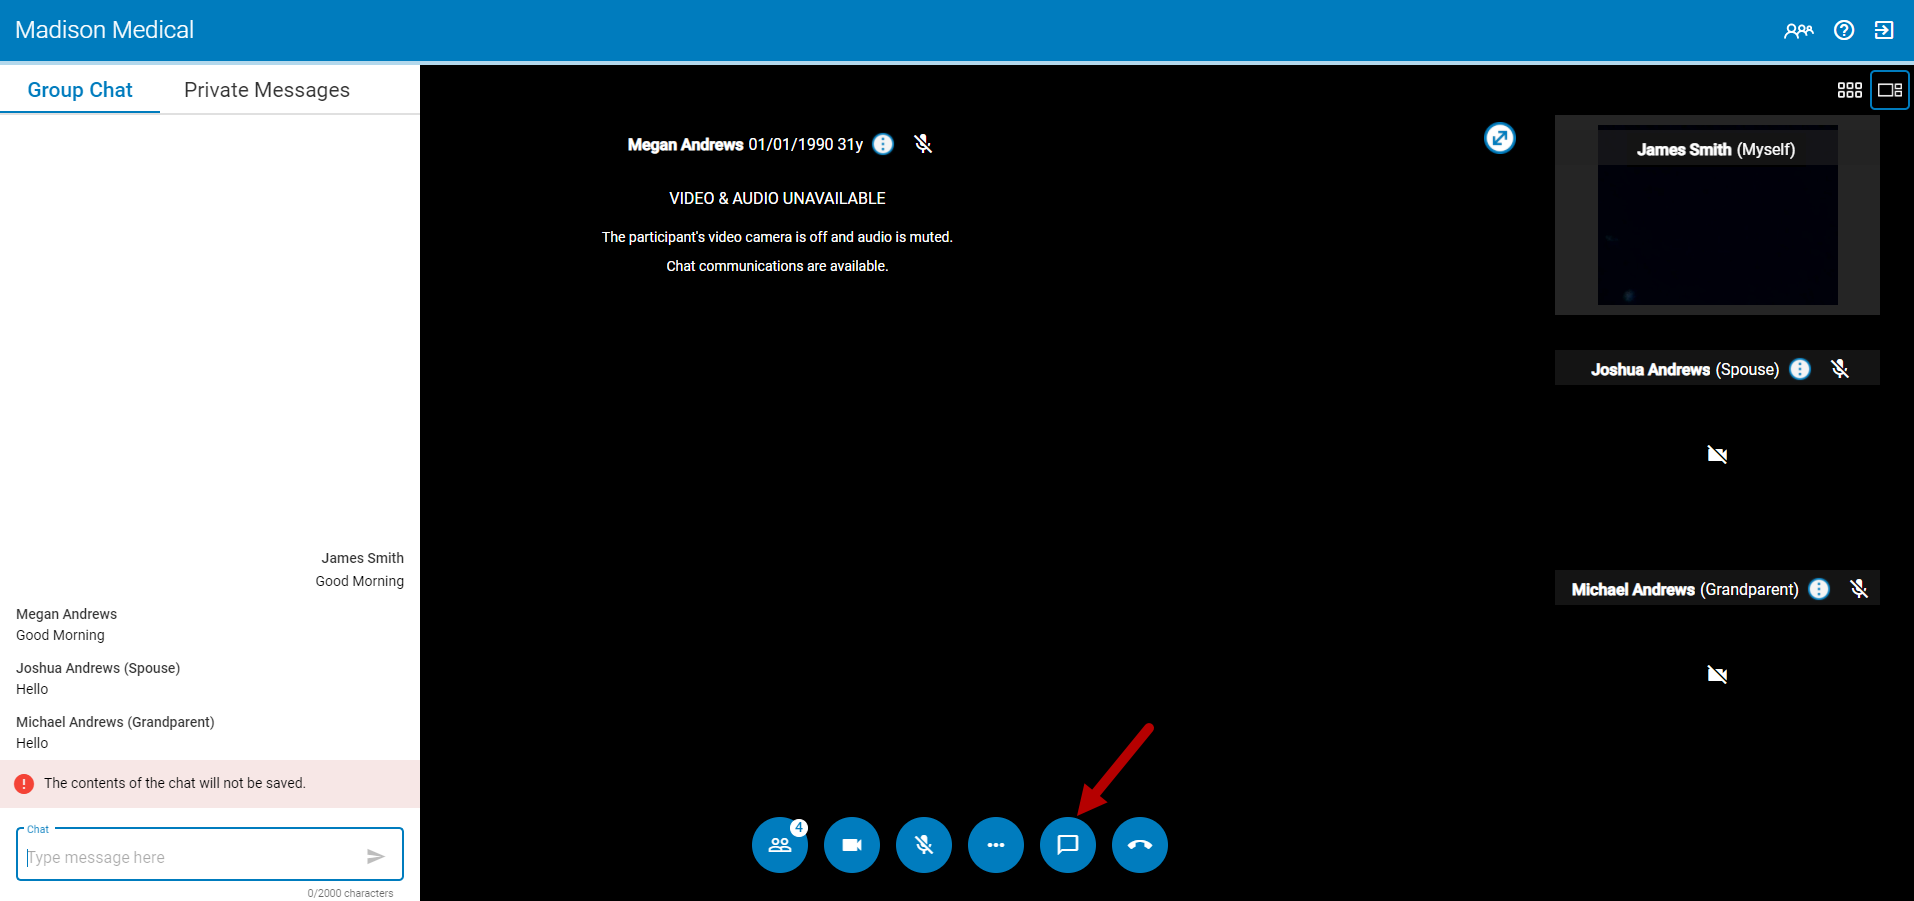
While in a group call you can send private messages to each participant or message all participants in a call. To do so, select the chat icon ![]() to open the chat window. This allows you to select either the Group Chat or the Private Messages tab.
to open the chat window. This allows you to select either the Group Chat or the Private Messages tab.
The Group Chat tab displays by default after selecting the chat icon.
Send a Group Chat
To send a message to all participants in a call, select the Group Chat tab in the chat window and then enter your message in the chat field. Select the arrow icon ![]() or Enter on your keyboard to send your message.
or Enter on your keyboard to send your message.
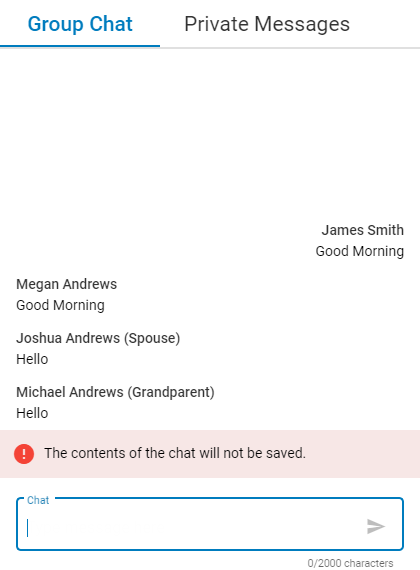
When sending a message, your name appears on the right and the participants' messages appear on the left.
If any group chat messages are unread, the number of unread messages displays in red next to the Group Chat tab.
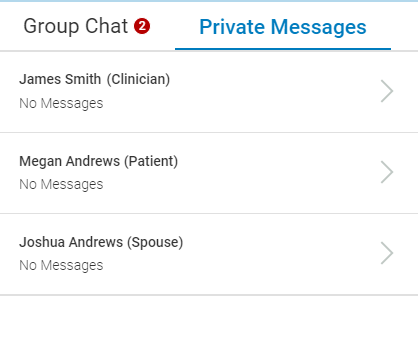
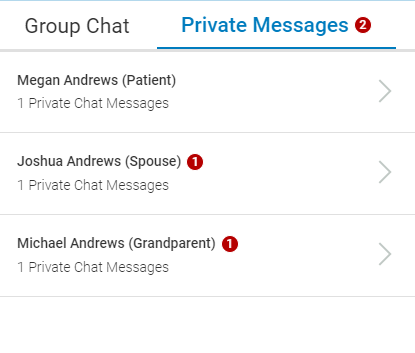
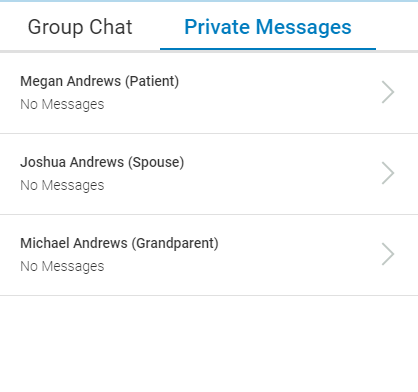
Send a Participant a Private Message
To send a participant a private message, select the Private Messages tab in the chat window and then select the participant's name from the list. In the subsequent chat window, enter your message.
You can also access the chat window and send a private messages by selecting the three dots icon ![]() next to a participant's name and selecting Send Private Message from the drop down.
next to a participant's name and selecting Send Private Message from the drop down.

Additionally, in the Private Messages tab, the number of unread messages displays in red next to the tab. The number of unread messages for each participant displays next to the participant's role in the list. The total number of messages (read and unread) displays under the participant's name. Whenever a message is read, this indicator disappears.