To support Greenway Telehealth™ functionality in Prime Suite, users that have the proper permission and securities can schedule Telehealth appointments.
This topic explains the various methods within Prime Suite that can be used to schedule a Greenway Telehealth™ appointment. Drag and Drop, Schedule Wizard, and Quick Search Method offer various means to accomplish this task; each serves a specific scheduling need or workflow.
Requires Prime Suite 18.00.04.00 or later.
Use the screenshots that reflect your current version of Prime Suite. The captions below the screenshots indicate the version number.
Set Up
A provider must have Telehealth Provider? selected in System > Care Providers to have the ability to make and work with Telehealth appointments in the Prime Suite. After checking the Telehealth Provider? check box, users have the option to add in a Telehealth room URL for the provider.
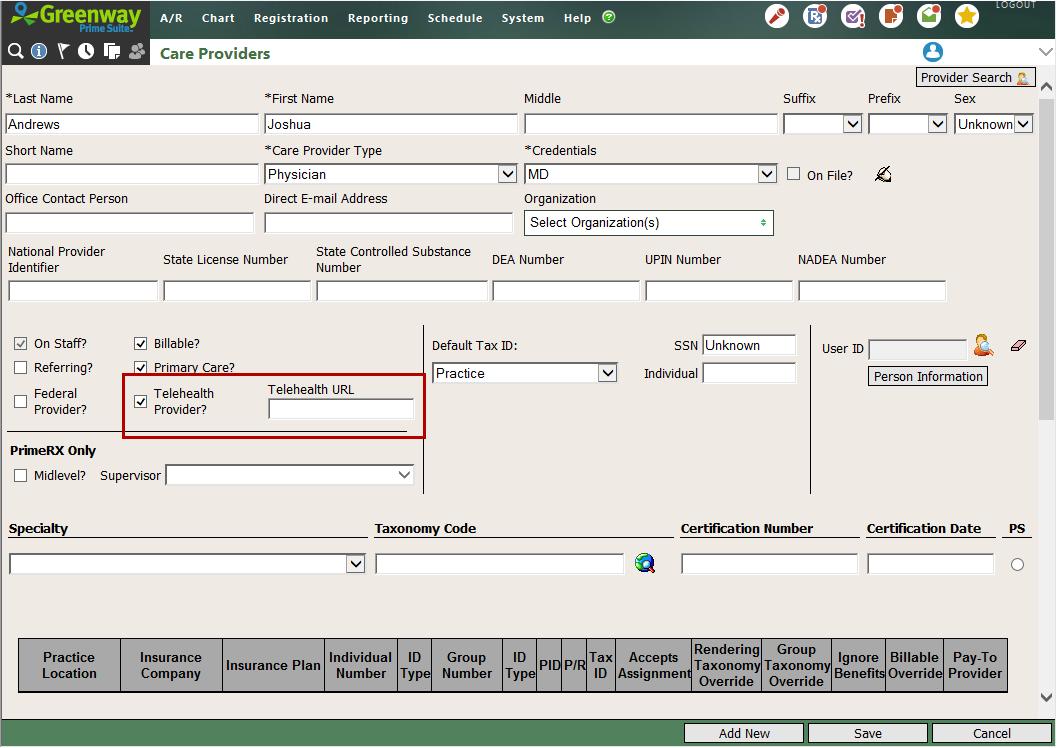
Care Providers - v18.00
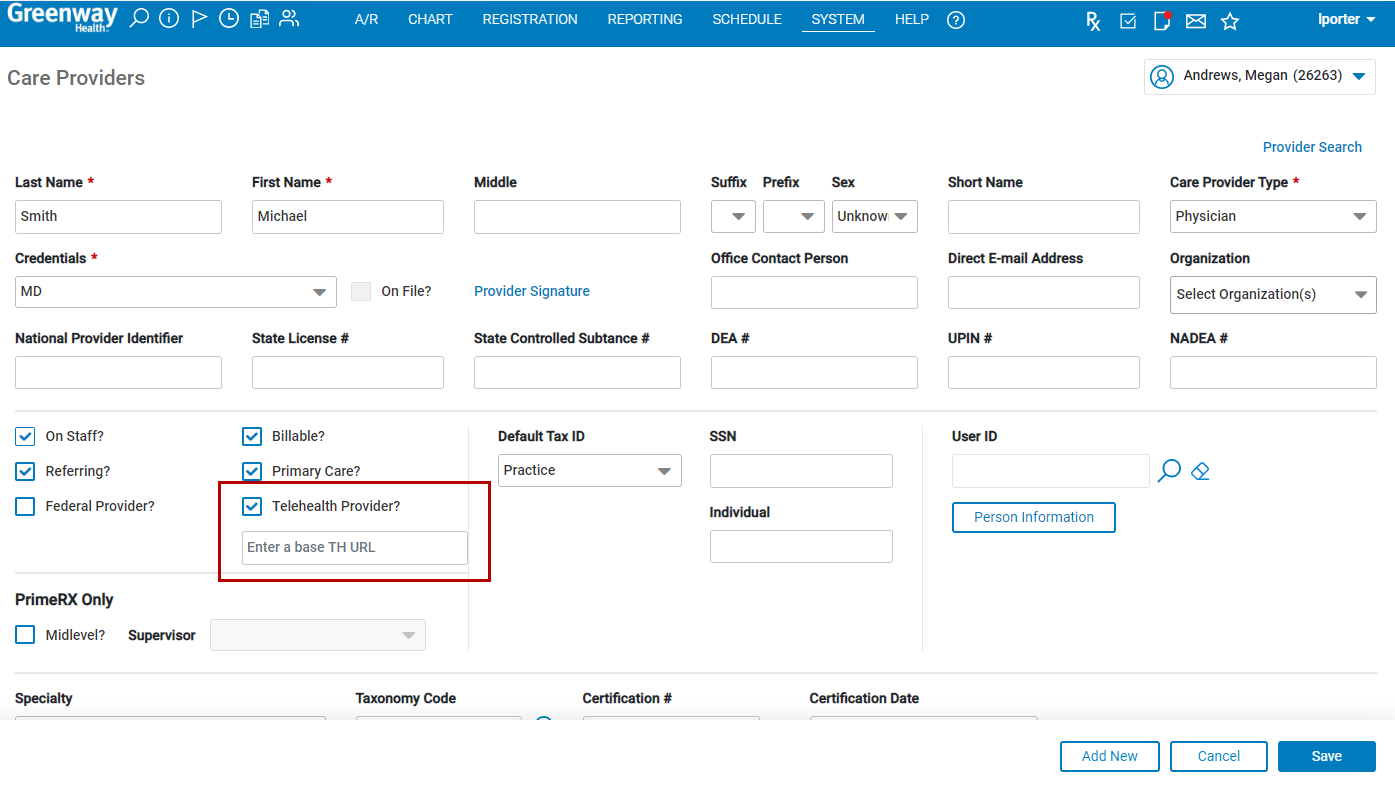
Care Providers - v18.30 or later
To quickly view whether a provider is enabled as a Telehealth Provider, you can search for all Telehealth enabled providers in your practice by selecting Provider Search in the Care Providers window, selecting Yes from the Telehealth Provider dropdown, and then selecting Search. All Telehealth enabled providers will appear with a 'Yes' or green check mark in the Telehealth column.
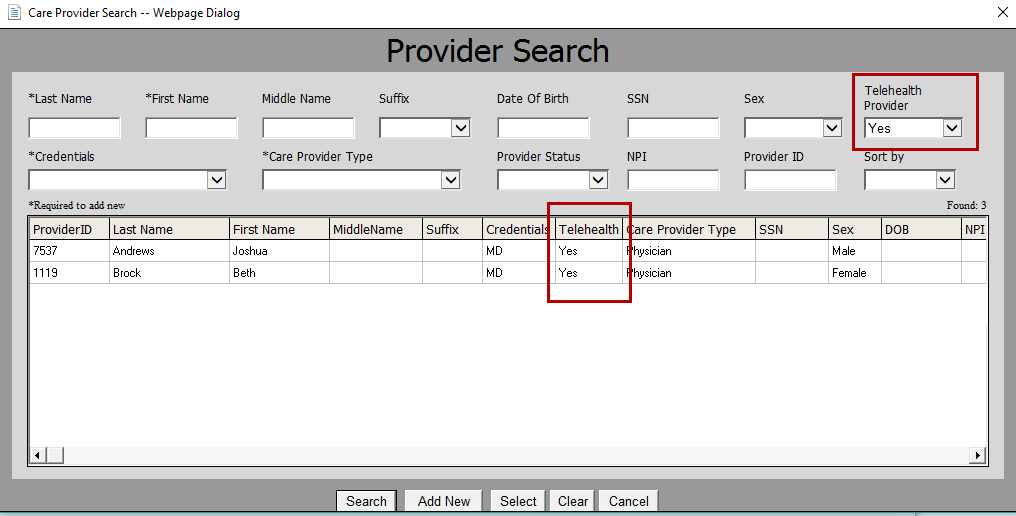
Provider Search - v18.00
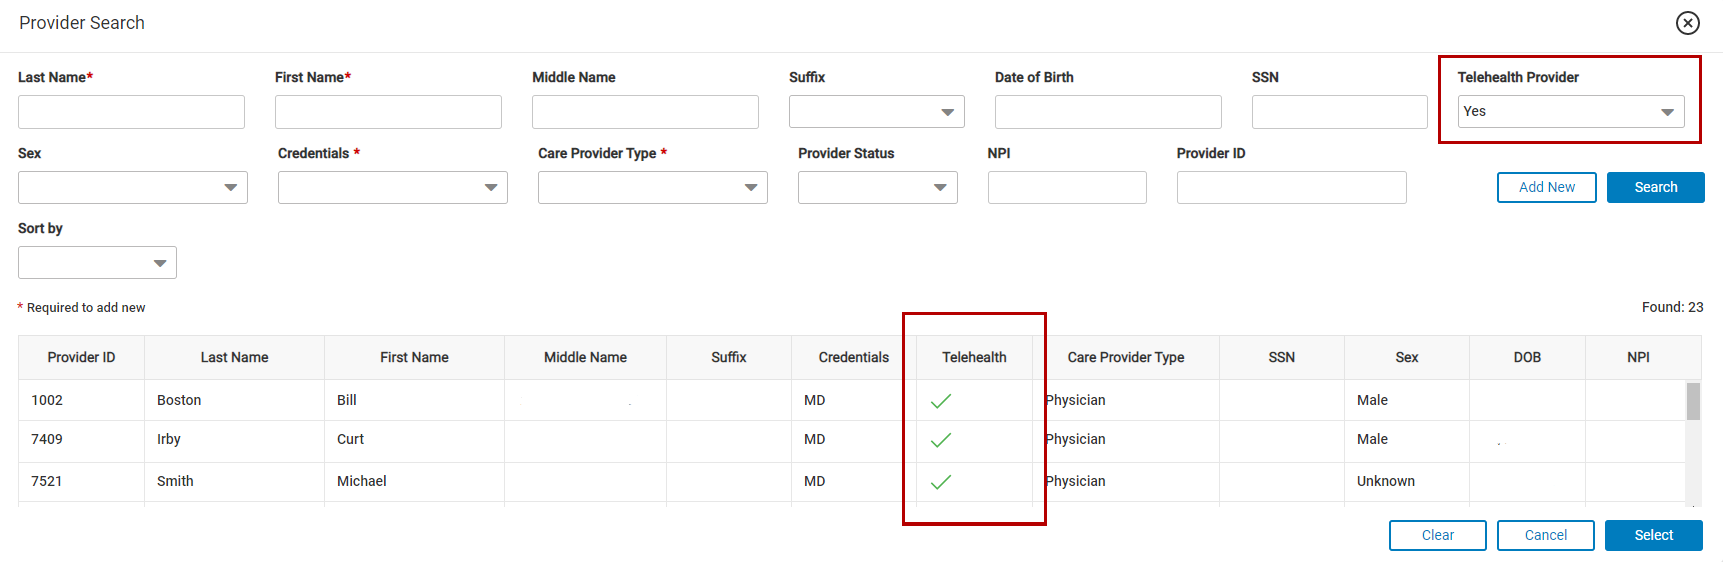
Provider Search - v18.30 or later
Schedule a Telehealth Appointment using the Drag and Drop Method
The Drag and Drop method is the best way to schedule appointments in the near future or if the specific date needed is known. This method is also used when the scheduler will be “squeezing” the patient onto the schedule.
| 1. | Search for and select a patient by using the Patient Search icon or choose from the Recent Patients List. |
This is referred to as putting the patient “in the buffer.”
| 2. | Select the Schedule menu and choose Appointment Scheduling. |
| 3. | Select the check box next to each Resource and Location(s) that the patient requires for this appointment. |
The Locations section will only display for practices with multiple locations.
| 4. | Enter a date range or use the default and, if applicable, check the box next to each day of the week that should be considered as an option. |
| 5. | Change the Interval time frame from dropdown list, if needed. |
| 6. | Select the View Schedules link. Available appointments and times display for the selected resources. Resources will be listed in alphabetical order on the schedule. |
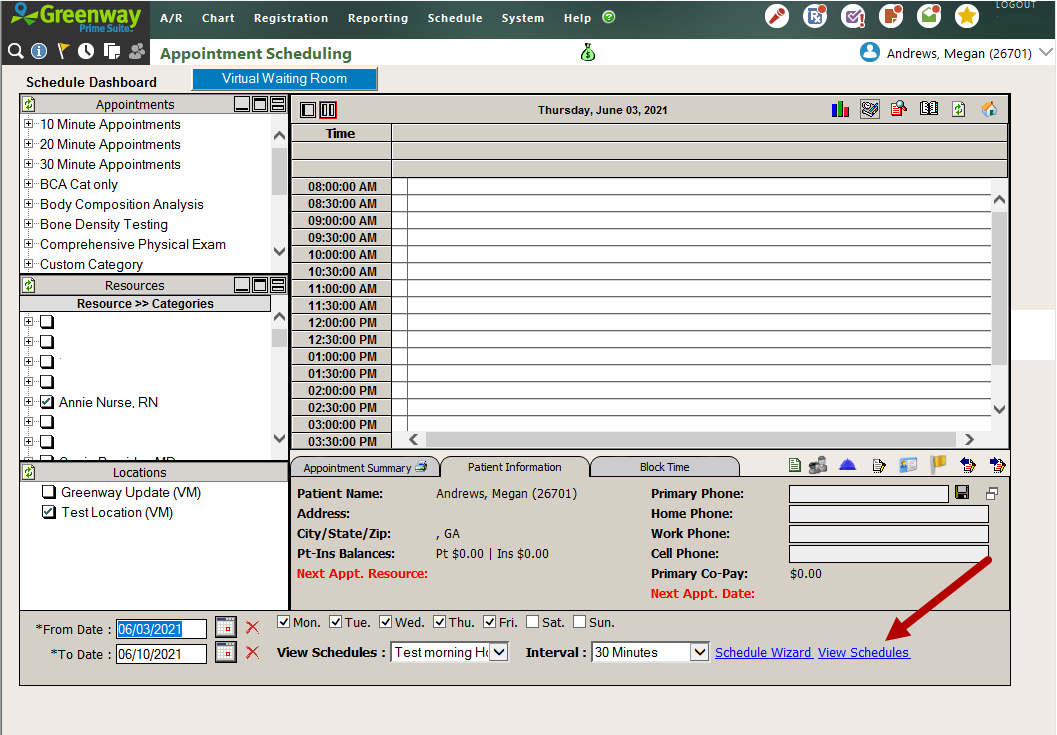
View Schedules - v18.00
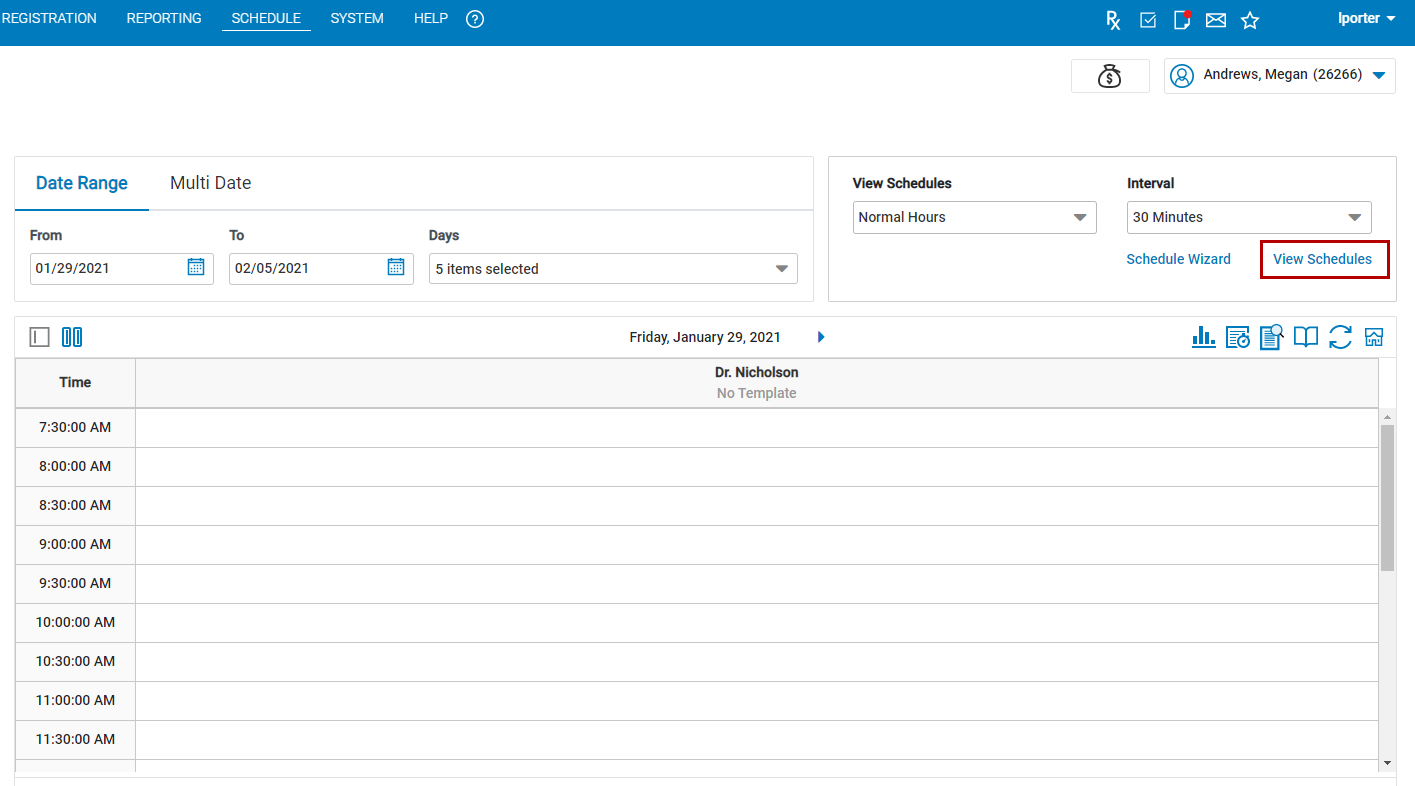
View Schedules - v18.30 or later
| 7. | Under the Appointments list, open a Category heading. Locate the desired appointment type. Select and hold the paper icon in front of the appointment type, drag it to an appointment time slot, and release. |
| 8. | Verify the information (particularly the appointment duration) within the Schedule window that appears. Make any necessary changes. |
| 9. | If necessary, select the Authorization # icon to link an authorization to this appointment. |
| 10. | Enter a Chief Complaint and Comments, if necessary. |
| 11. | Select the Telehealth check box. |
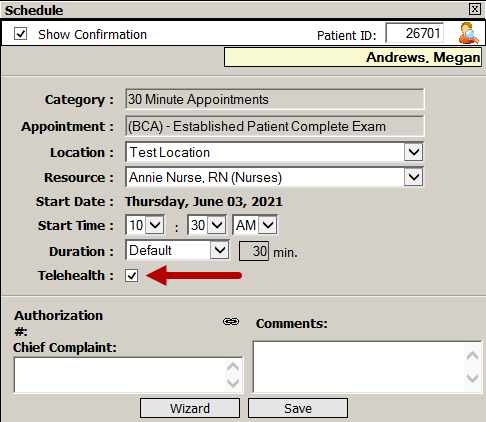
Schedule Window - v18.00
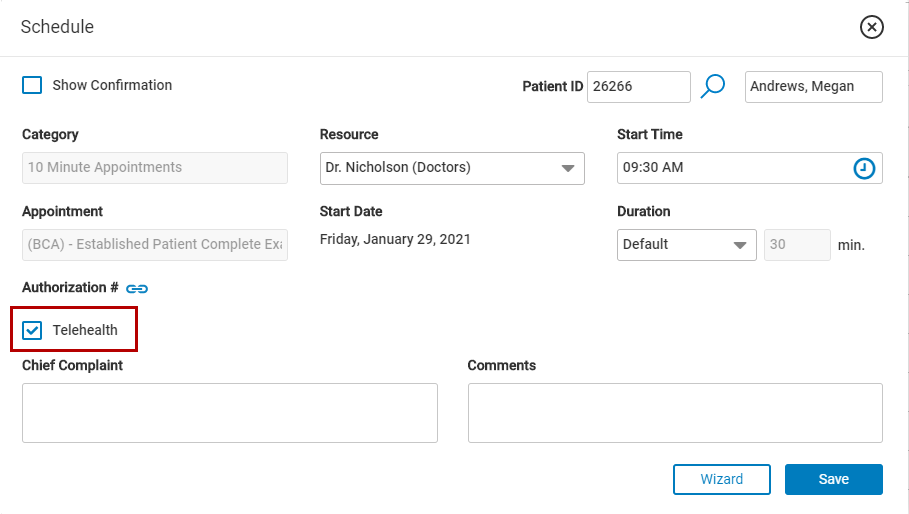
Schedule Window - v18.30 or later
| 12. | Select the Save button. The appointment will be placed on the provider's schedule and will be highlighted with a yellow border. |
If you select the Show Confirmation check box, a Telehealth icon displays next to the appointment type after you select Save.
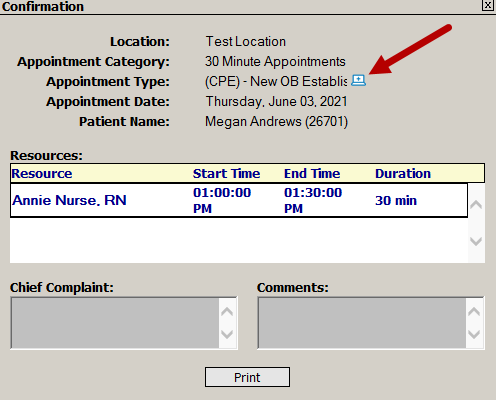
Confirmation Window - v18.00
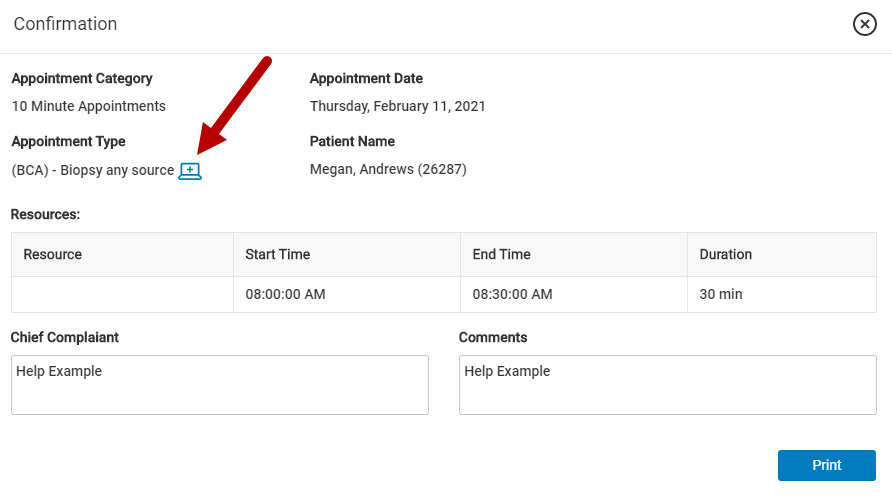
Confirmation Window - v18.30 or later
| 13. | After selecting Save, TH appears in the time slot and in Appointment Summary the Telehealth icon displays next to the appointment type. |
![]()
Appointment Summary - v18.00
![]()
Appointment Summary - v18.30 or later
The Telehealth icon does not launch Greenway Telehealth. It is only used to identify a Telehealth appointment.
The Telehealth icon also displays in Patient Info and in Visit History in the Facesheet.
Schedule a Telehealth Appointment using the Schedule Wizard
| 1. | Put a patient in the buffer. |
| 2. | Select Schedule > Appointment Scheduling. |
| 3. | Select Schedule Wizard. |
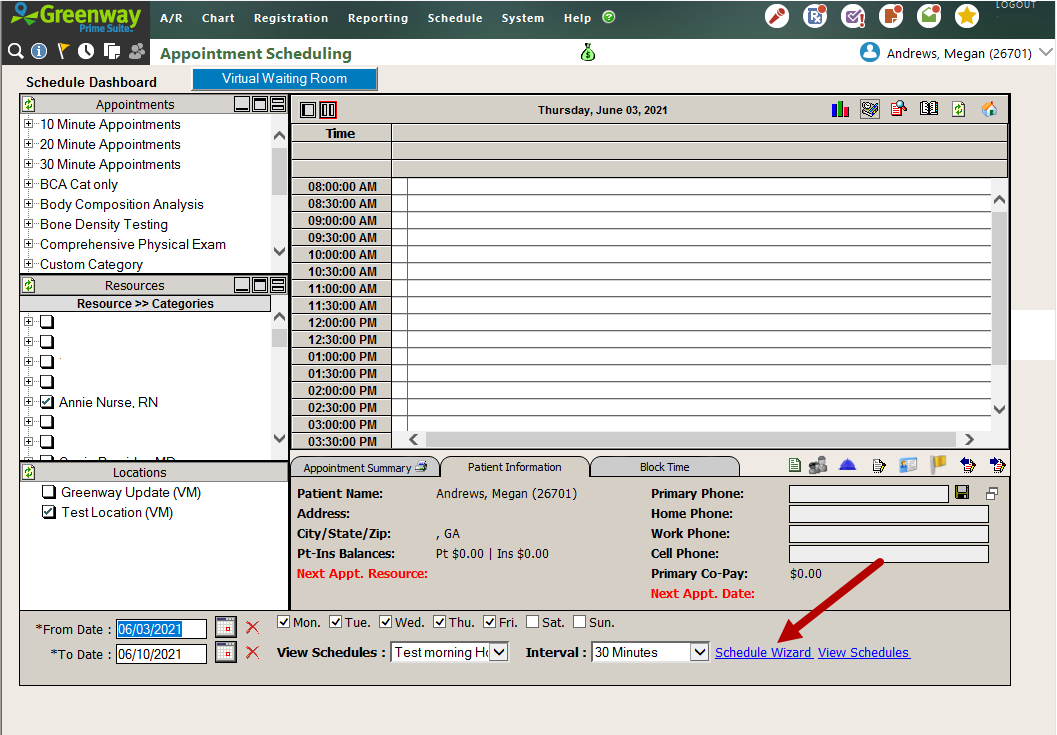
Schedule Wizard - v18.00
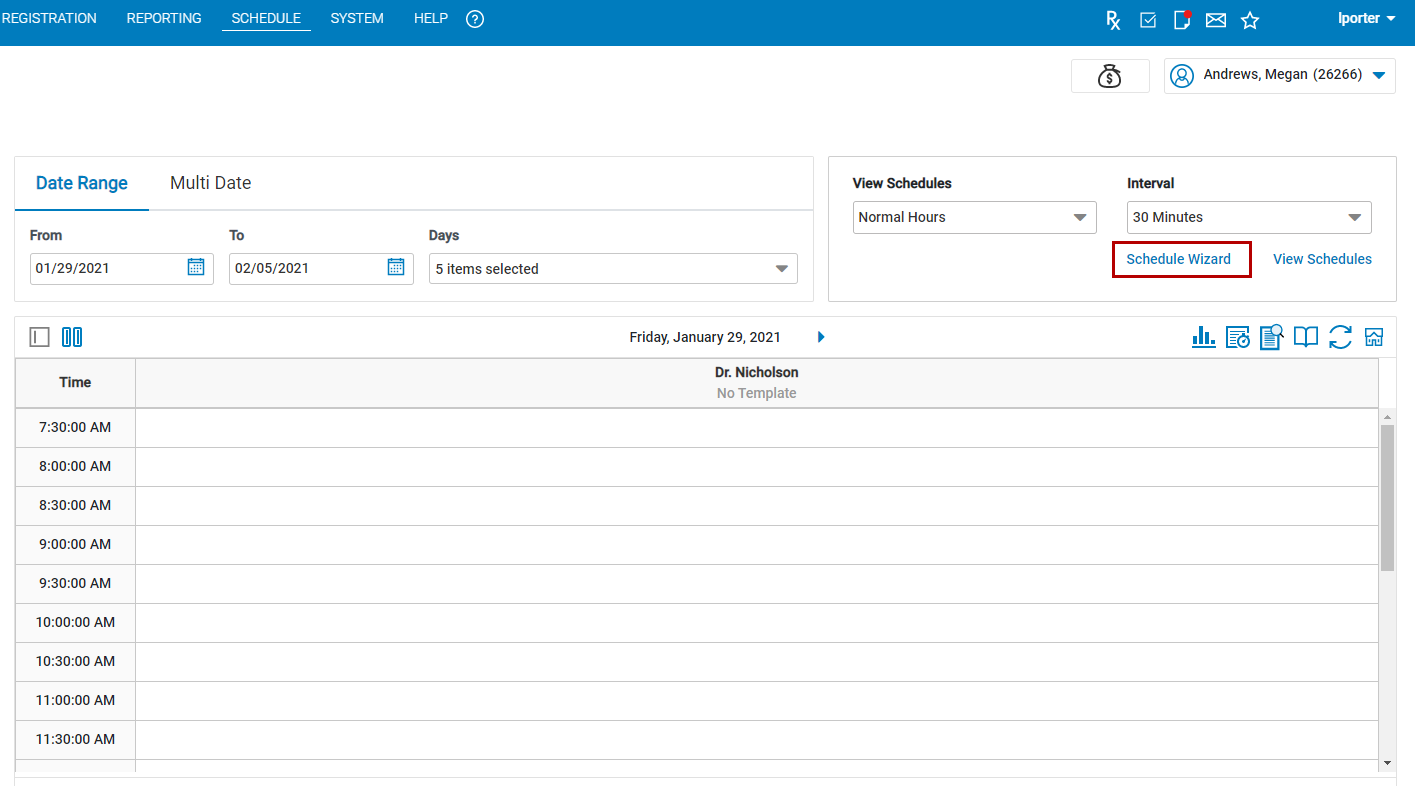
Schedule Wizard - v18.30 or later
| 4. | Select the Telehealth check box. |
Selecting the Telehealth check box also filters out any providers that are not set as a Telehealth Provider in Care Providers.
| 5. | Select the Ignore Conflicts check box if you want the wizard to return appointment time slots regardless of existing appointment conflicts. |
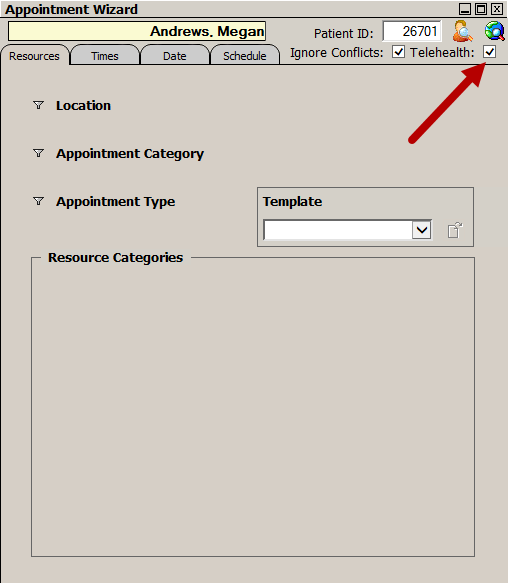
Appointment Wizard - v18.00
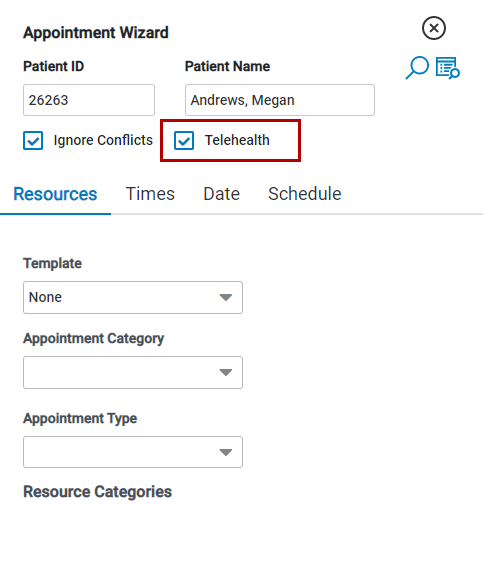
Appointment Wizard - v18.30 or later
| 6. | Select a Template, Appointment Category, and Appointment Type. |
| 7. | Fill in the Resource Categories as necessary. |
- Select Any to locate open times with any one of the selected resources
- Select All to locate open times with all of the selected resources.
| 8. | Optionally select the Times and Date tab to specify a time and date range for the appointments search. |
| 9. | Select the Find Appointments icon  (v18.00) (v18.00) |
| 10. | Select a time slot to create the Telehealth appointment. |
| 11. | In the Confirmation window, the Telehealth icon appears next to the Appointment Type. |
Confirmation - v18.00
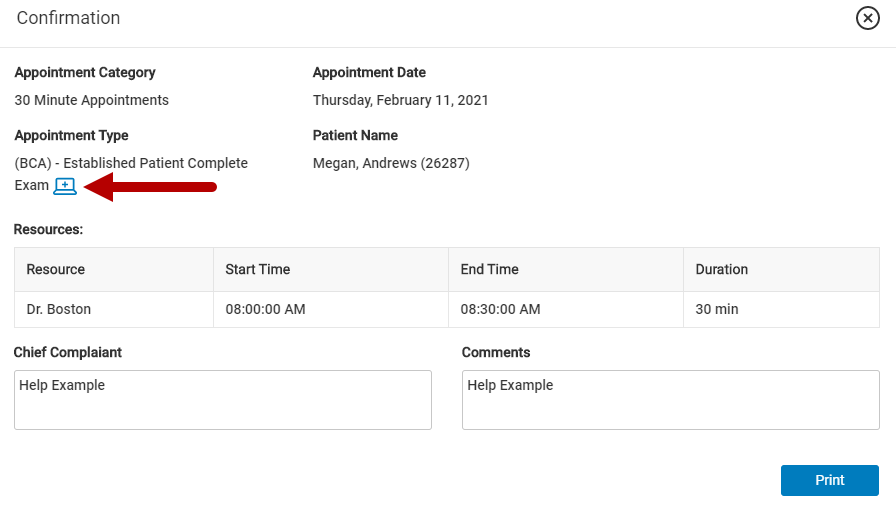
Confirmation - v18.30 or later
| 12. | Select X to exit the Confirmation window and the Appointment Wizard. |
| 13. | TH appears in the time slot and in Appointment Summary the Telehealth icon displays next to the appointment type. |
![]()
Appointment Summary - v18.00 or later
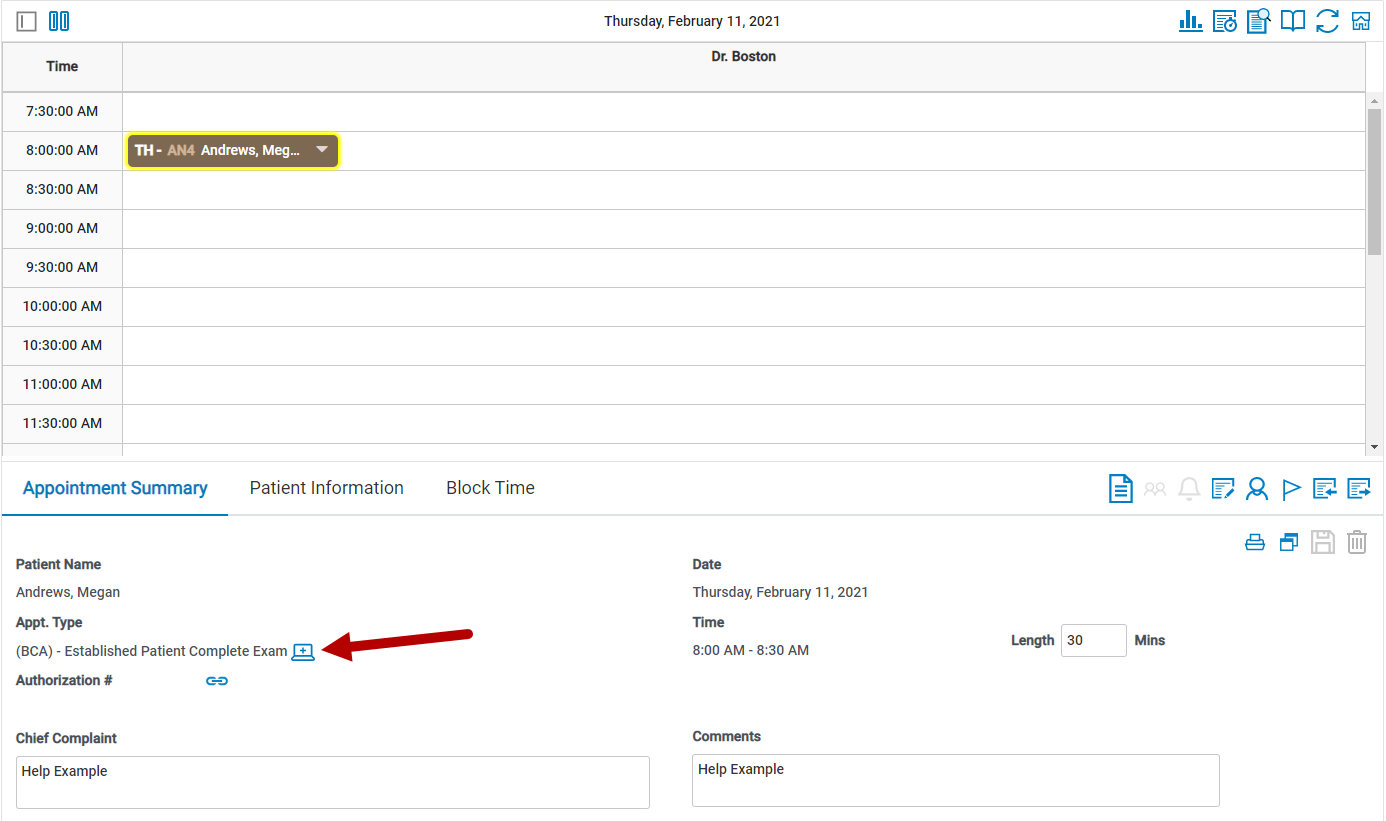
Appointment Summary - v18.30 or later
The Telehealth icon does not launch Greenway Telehealth. It is only used to identify a Telehealth appointment.
Scheduling an Appointment Using the Quick Search Method
To schedule using Quick Search:
| 1. | Put the patient in the buffer. |
| 2. | Select Scheduleand then Appointment Scheduling. |
| 3. | Select Schedule Dashboard at the top left corner of the screen and then select Quick Search. |
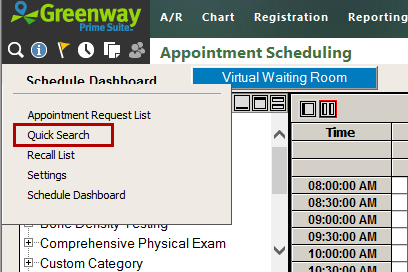
Quick Search - v18.00
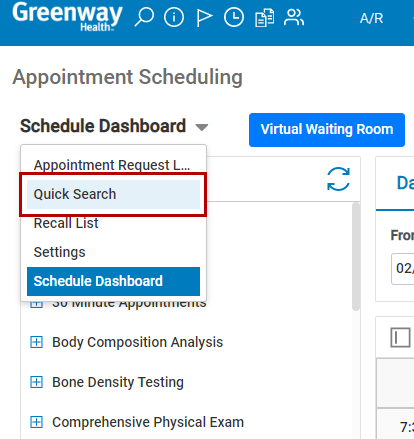
Quick Search - v18.30 or later
| 4. | Confirm or edit the beginning and ending dates to use in the search for appointments in the From and To fields. |
| 5. | Select a template from the Template dropdown list. |
| 6. | Select the TH check box to filter by available telehealth appointments. |
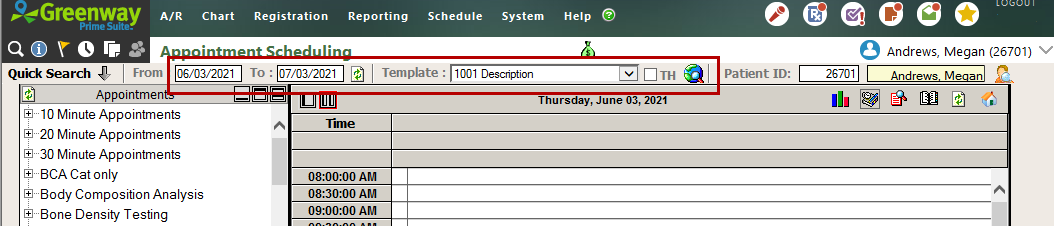
Quick Search - v18.00
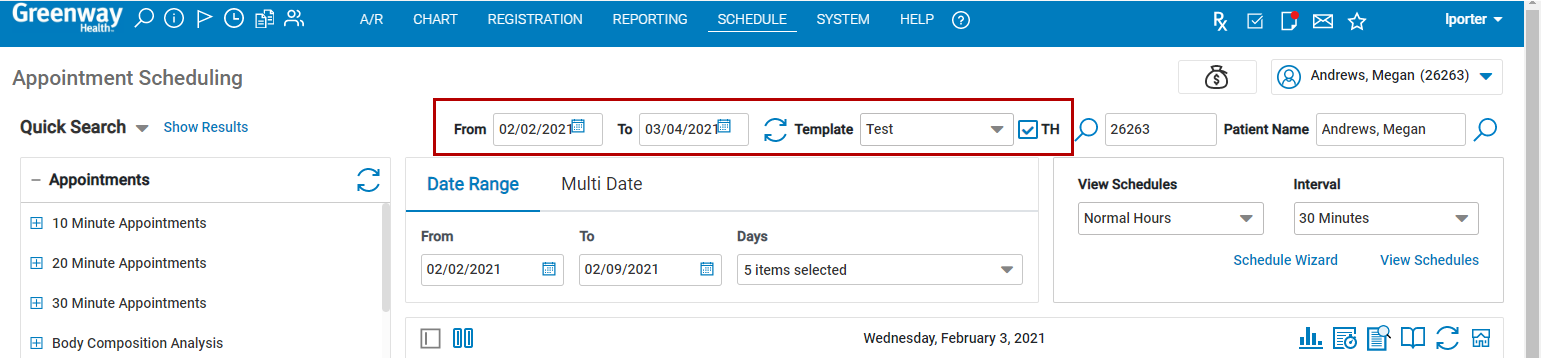
Quick Search - v18.30 or later
| 7. | Select the Search icon (v18.00) or |
| 8. | The Quick Search panel opens with all the available appointments that meet the selected criteria. |
| 9. | If necessary, select the Link Authorization icon to link an authorization to this appointment. |
| 10. | Type the Chief Complaint and Comments, if needed. |
| 11. | If necessary, select the Go to Next Page arrow to view more results. |
| 12. | Select an appointment time slot. The appointment then populates in the schedule and will be highlighted with a yellow border. |
| 13. | Select the up arrow or Hide Results to close the Quick Search panel. |

